# Teacharium documentation
Source: https://docs.teacharium.io. Index: https://docs.teacharium.io/llms.txt
---
Source: https://docs.teacharium.io
# Teacharium user guide
## Jump in and build a lesson
Watch complete projects come together from start to finish — then try it yourself.
[Paramedic scenario lesson showing a branching dialogue with decision choices](https://docs.teacharium.io/docs/see-it-built/branching-dialogue.md): Paramedic Scenario Create a branching dialogue where learner decisions drive the outcome.
[Chemistry simulation showing a burette dispensing NaOH into a flask to observe pH changes](https://docs.teacharium.io/docs/see-it-built/chemistry-simulation.md): Chemistry Simulation Combine widgets, variables, and branching to build an interactive lab.
[Learning style results showing preference scales for hands-on, collaborative, and structured learning](https://docs.teacharium.io/docs/see-it-built/learning-inventory.md): Learning Inventory A learning style survey across three dimensions with visualized results.
[Cuban Missile Crisis decision-making scenario with historical choices](https://docs.teacharium.io/docs/see-it-built/cuban-missile-crisis.md): Cuban Missile Crisis Navigate the choices of the Cuban missile crisis as President Kennedy.
## Get started
New to Teacharium? Start here to learn the basics and build your first lesson.
- [What is Teacharium?](https://docs.teacharium.io/docs/get-started/what-is-teacharium.md) -- Video introduction and overview
- [How Teacharium works](https://docs.teacharium.io/docs/get-started/core-concepts.md) -- Sections, steps, variables, and components
## Build your lesson
Add text, images, layouts, voice, and quizzes to your lesson steps.
- [Plan with a lesson abstract](https://docs.teacharium.io/docs/build-your-lesson/lesson-abstract.md) -- Define goals and structure before building
- [Add & format content](https://docs.teacharium.io/docs/build-your-lesson/writing-and-formatting.md) -- Text components and rich formatting
- [Add images & media](https://docs.teacharium.io/docs/build-your-lesson/images-and-media.md) -- Media library and Unsplash integration
- [Design with grid layouts](https://docs.teacharium.io/docs/build-your-lesson/grid-layouts.md) -- Structured multi-column layouts
- [Add voice & narration](https://docs.teacharium.io/docs/build-your-lesson/voice-and-narration.md) -- Text-to-speech and voiceover options
- [Adding questions](https://docs.teacharium.io/docs/build-your-lesson/adding-questions.md) -- Video tour of all question types
- [Reuse step templates](https://docs.teacharium.io/docs/build-your-lesson/step-templates.md) -- Save and reuse common layouts
## Make it interactive
Build lessons where learners choose their own path.
- [Branching lessons overview](https://docs.teacharium.io/docs/make-it-interactive/branching-lessons.md) -- Video guide to branching techniques
- [Variables and interactive controls](https://docs.teacharium.io/docs/make-it-interactive/variables-and-interactive-controls.md) -- Connect components and show/hide content based on variables
## See it built
Watch complete projects come together from start to finish.
- [Build a paramedic scenario](https://docs.teacharium.io/docs/see-it-built/branching-dialogue.md) -- Create a branching dialogue with decision points
- [Build a chemistry simulation](https://docs.teacharium.io/docs/see-it-built/chemistry-simulation.md) -- Combine widgets, variables, and branching
- [Create a learning inventory](https://docs.teacharium.io/docs/see-it-built/learning-inventory.md) -- Build an AI-powered preference assessment
- [Build a custom results widget](https://docs.teacharium.io/docs/see-it-built/results-widget.md) -- Visualize learner results with a radar chart
## Share your work
Get your lessons in front of learners.
- [Publishing & delivering lessons](https://docs.teacharium.io/docs/share-your-work/publishing.md) -- Publish versions and deliver to learners
- [Embed in your site](https://docs.teacharium.io/docs/share-your-work/embedding.md) -- Deliver lessons in your website or app
- [LTI integration](https://docs.teacharium.io/docs/share-your-work/lti.md) -- Connect lessons to your LMS
## Reference
Detailed docs for question types, logic widgets, scoring, and more.
- [Question types](https://docs.teacharium.io/docs/reference/multiple-choice.md) -- Multiple choice, matching, ordering, matrix, and more
- [Logic widgets](https://docs.teacharium.io/docs/reference/logic-gating.md) -- Control navigation, gating, branching, and hints
- [Navigation choices](https://docs.teacharium.io/docs/reference/navigation-choices.md) -- Learner-driven branching and path selection
- [Scoring & items](https://docs.teacharium.io/docs/reference/scoring-and-feedback.md) -- How items track attempts and scores
## Developer documentation
API access and embedding for developers.
- [Developer documentation](https://docs.teacharium.io/api-documentation.md) -- API authentication, endpoints, and embedding guides
## Public roadmap
We share our product roadmap publicly so you can see what we're working on, our timelines, and upcoming features. Visit the roadmap to follow our progress and see what's coming next for Teacharium.
[View the public roadmap](https://www.teacharium.io/roadmap)
---
Source: https://docs.teacharium.io/docs
---
## title: User Documentation
# User Documentation
Welcome to the Teacharium user documentation. Use the sidebar to navigate, or browse by section below.
## Get Started
- [What is Teacharium?](https://docs.teacharium.io/docs/get-started/what-is-teacharium.md)
- [How Teacharium Works](https://docs.teacharium.io/docs/get-started/core-concepts.md)
## Build Your Lesson
- [Plan with a Lesson Abstract](https://docs.teacharium.io/docs/build-your-lesson/lesson-abstract.md)
- [Add & Format Content](https://docs.teacharium.io/docs/build-your-lesson/writing-and-formatting.md)
- [Add Images & Media](https://docs.teacharium.io/docs/build-your-lesson/images-and-media.md)
- [Design with Grid Layouts](https://docs.teacharium.io/docs/build-your-lesson/grid-layouts.md)
- [Add Voice & Narration](https://docs.teacharium.io/docs/build-your-lesson/voice-and-narration.md)
- [Adding Questions](https://docs.teacharium.io/docs/build-your-lesson/adding-questions.md)
- [Reuse Step Templates](https://docs.teacharium.io/docs/build-your-lesson/step-templates.md)
## Make It Interactive
- [Branching Lessons](https://docs.teacharium.io/docs/make-it-interactive/branching-lessons.md)
- [Variables and Interactive Controls](https://docs.teacharium.io/docs/make-it-interactive/variables-and-interactive-controls.md)
## See It Built
- [Build a Paramedic Scenario](https://docs.teacharium.io/docs/see-it-built/branching-dialogue.md)
- [Build a Chemistry Simulation](https://docs.teacharium.io/docs/see-it-built/chemistry-simulation.md)
- [Learning Inventory Part One](https://docs.teacharium.io/docs/see-it-built/learning-inventory.md)
- [Learning Inventory Part Two — Custom Results Widget](https://docs.teacharium.io/docs/see-it-built/results-widget.md)
- [Build a Cuban Missile Crisis Scenario](https://docs.teacharium.io/docs/see-it-built/cuban-missile-crisis.md)
## Share Your Work
- [Publishing & Delivering Lessons](https://docs.teacharium.io/docs/share-your-work/publishing.md)
- [Embed in Your Site](https://docs.teacharium.io/docs/share-your-work/embedding.md)
- [LTI Integration](https://docs.teacharium.io/docs/share-your-work/lti.md)
## Reference
**Questions**
- [Multiple Choice](https://docs.teacharium.io/docs/reference/multiple-choice.md)
- [Matching](https://docs.teacharium.io/docs/reference/matching.md)
- [Ordering](https://docs.teacharium.io/docs/reference/ordering.md)
- [Fill in the Blank](https://docs.teacharium.io/docs/reference/fill-in-the-blank.md)
- [Cloze Question](https://docs.teacharium.io/docs/reference/cloze-question.md)
- [Matrix Choice](https://docs.teacharium.io/docs/reference/matrix-choice.md)
- [This or That](https://docs.teacharium.io/docs/reference/this-or-that.md)
**Interactivity**
- [Navigation Choices](https://docs.teacharium.io/docs/reference/navigation-choices.md)
- [Logic Widgets](https://docs.teacharium.io/docs/reference/logic-gating.md)
- [Scoring & Items](https://docs.teacharium.io/docs/reference/scoring-and-feedback.md)
- [Widget Library](https://docs.teacharium.io/docs/reference/widget-library.md)
## Support
- [Get Help](https://docs.teacharium.io/docs/support.md)
---
Source: https://docs.teacharium.io/docs/get-started/what-is-teacharium
# What Is Teacharium?
Teacharium is a lesson builder for creating interactive learning experiences. You design lessons with drag-and-drop components, then deploy them however you want: embed directly from Teacharium, or export and self-host for full control.

---
## Build lessons people actually want to take
Most educational content is static. Walls of text. Click-through slides. Learners zone out because there's nothing to _do_.
Teacharium gives you a visual editor with components that respond to learners: quizzes, sliders, drag-and-drop activities, simulations, custom widgets. Variables wire components together so a slider can control a chart, or a learner's input can change what happens next.
The result is lessons that feel like products, not PowerPoints.
[Branching dialogue lesson](https://docs.teacharium.io/sample-lessons/branching-dialogue.md): Branching Dialogue
[Chemistry simulation lesson](https://docs.teacharium.io/sample-lessons/acid-titration.md): Acid Titration Simulation
[Learning inventory lesson](https://docs.teacharium.io/sample-lessons/learning-inventory.md): Learning Inventory
[Cuban Missile Crisis decision-making scenario](https://docs.teacharium.io/sample-lessons/cuban-missile-crisis.md): Cuban Missile Crisis
---
## Three ways to deploy
### You Host It
Export and self-host
Full ownership. Download your lesson and run it on your own servers.
✓ No vendor lock-in or per-learner fees
✓ Learner data stays on your systems
✓ Host anywhere you already run code
✓ You built it, you own it
[Publishing docs →](https://docs.teacharium.io/docs/share-your-work/publishing.md)
### We Host It
Embed from Teacharium
The simplest path. Teacharium hosts and delivers the lesson for you.
✓ Add an iframe snippet to your site or product
✓ No server setup or maintenance
✓ Automatic updates when you publish new versions
✓ Built-in learner progress tracking via API
[Embedding docs →](https://docs.teacharium.io/docs/share-your-work/embedding.md)
LTI integration
Connect directly to your LMS. Teacharium supports LTI so grades and
progress sync automatically.
✓ Works with Canvas, Moodle, Blackboard, and other LTI-compatible
platforms
✓ Grades pass back to the LMS gradebook automatically
✓ Single sign-on for learners through their LMS
[LTI docs →](https://docs.teacharium.io/docs/share-your-work/lti.md)
---
## AI that does the tedious parts for you
Good instructional design is a human skill. Knowing what to teach, how to sequence it, what questions to ask, when to challenge and when to support -- no AI replaces that. Our AI tools exist to remove the busywork so designers can spend their time on the parts that actually matter.
Starting from scratch is the hardest part of building a lesson. Teacharium's AI tools get you past that.
Describe what you want to teach and the AI generates a full lesson structure with sections, steps, questions, and content that you can edit and refine. Need images? The media library generates them. Want a custom interactive widget? Describe it in plain language and the AI writes the code.
You make the creative decisions. The AI handles the grunt work.
---
## Who it's for
- **EdTech companies** that would rather ship learning features than spend years building authoring infrastructure from scratch. Teacharium gives you a full lesson editor so your engineering team can focus on what makes your product different.
- **Educators and instructional designers** building interactive curriculum without writing code
- **Companies** tired of paying per-learner licensing fees for internal training
- **Developers** who want a lesson engine they can extend with custom widgets
---
## Get started
Head to [How Teacharium Works](https://docs.teacharium.io/docs/get-started/core-concepts.md) for a video walkthrough and core concepts.
---
Source: https://docs.teacharium.io/docs/get-started/core-concepts
# How Teacharium Works
Understand the building blocks of every Teacharium lesson before you start creating.
Video (Teacharium Introduction): [https://www.youtube.com/watch?v=5fTl\_REaITs](https://www.youtube.com/watch?v=5fTl_REaITs)
## Lessons, sections, and steps
- **Lesson** — A complete learning experience you author and share with learners.
- **Section** — A group of related steps (e.g., introduction, instruction, quiz, conclusion).
- **Step** — A single screen the learner sees. Each step is a visual canvas where you place components.
## Components
Components are the building blocks you place on a step: text, images, questions, inputs, buttons, and more. You drag components from the sidebar onto the canvas.
## Variables
Variables let components talk to each other and make lessons dynamic. A slider can set a variable, and a text block can display it using `{{variableName}}` syntax. Variables also power branching, conditional visibility, and scoring.
## Items
Items are interactive components (like questions) that automatically track whether the learner has attempted them, whether the answer is correct, and what score was earned. See [Scoring & Items](https://docs.teacharium.io/docs/reference/scoring-and-feedback.md) for details.
## Widgets
Widgets extend Teacharium with new component types. Browse built-in widgets in the [Widget Library](https://docs.teacharium.io/docs/reference/widget-library.md), or [create your own](https://docs.teacharium.io/docs/see-it-built/results-widget.md) using AI-powered vibe coding.
---
Source: https://docs.teacharium.io/docs/build-your-lesson/lesson-abstract
# Lesson abstract
The lesson abstract is a description that lets an author plan what will appear in a lesson.
It’s the place to capture the lesson’s goals, target learners, scope, and the kinds of interactions or content you expect to include.
Authors use the abstract as a planning tool and as a signal to downstream systems (including the AI agent) about intent and constraints.

### Why an abstract matters
- Provides a single place to describe the desired learning outcomes and user experience before building the lesson.
- Keeps authors focused: writing an abstract encourages you to clarify scope and avoid drifting into unrelated content.
- Serves as the canonical prompt for automated content generation: the AI agent reads the abstract to produce drafts, exercises, and media suggestions that match the author’s intent.
### What to include
Keep the abstract short and readable — a few sentences to a couple of paragraphs. Useful elements:
- Learning goals: what should learners know or be able to do after this lesson?
- Audience & prerequisites: who is this for and what should they already know?
- Scope and format: short summary of sections, activities, or types of problems (e.g., "2 short explanations, 3 practice items, 1 mini-project").
- Sections & Steps to create a high-level overview of the lesson structure.
- Constraints: time limits, accessibility notes, or content that must be avoided.
### How the AI can help create the abstract
You can ask the AI agent to help draft an abstract based on a learning goal or topic. For example:
"Help me write an abstract for a lesson that teaches middle school students how to add and subtract fractions with unlike denominators."
### How the AI agent uses the abstract
When you save an abstract, the AI agent can use it as the a specification for generating lesson content later. The agent can:
- Create an initial lesson section & step structure aligned to the abstract.
- Propose a section structure and example problems or exercises matching the stated scope.
- Respect constraints and flags (for example, avoiding advanced math notation when audience is elementary).
The abstract is not a detailed script — it guides the AI to produce a first pass that the author can iterate on.
### Tips & best practices
- Be explicit about the learning goal — a clear goal yields better AI output.
- Mention required prior knowledge to avoid generating content that assumes too much.
- Keep abstracts concise; if you need detailed scripting, add that after the first auto-generated draft.
### Edge cases
- If an abstract is too vague (e.g., "Teach math"), the agent will ask clarifying questions or produce a very general draft. Be prepared to refine.
- If abstract conflicts with site-wide policies or flagged content, the agent will omit or warn about problematic suggestions.
### Quick checklist for a good abstract
- One-line learning goal
- Target audience/prereqs
- Expected format/sections
- Tone and constraints
Use the lesson abstract as your planning canvas. It’s the bridge between author intent and automated generation — write it clearly, and the AI will help fill in the details.
---
Source: https://docs.teacharium.io/docs/build-your-lesson/writing-and-formatting
# Write and format text
Add and style text content in your lesson steps.
Video (Write and Format Text): [https://www.youtube.com/watch?v=YMQbms0Zoak](https://www.youtube.com/watch?v=YMQbms0Zoak)
Text components are the backbone of most lesson steps. You can add headings, body copy, and richly formatted content — and even make that text dynamic by embedding variables.
## Adding a text component
Drag a **Text** component from the component sidebar onto your step canvas. You can place text anywhere on the canvas, including inside grid cells or other layout components.
Once placed, click the text to select it and start typing. A formatting toolbar appears at the top of the editor when text is selected.
## Formatting options
The rich text toolbar gives you standard formatting controls:
- **Bold** and _italic_ for emphasis
- Headings (H1, H2, H3) to create visual hierarchy
- Bulleted and numbered lists
- Inline code formatting
You can also mix styles within a single text component — bold a key term, add a heading above a paragraph, or create a bulleted list inside a longer explanation.
## Embedding variables in text
Variables let you display dynamic values in text. There are a couple special options in the toolbar that let you insert numeric expressions, or even input fields.
## Adjusting margins and spacing
Select a text component and open the **Style** panel on the right to adjust margins. You can add top and bottom margin to create breathing room between components without needing to add blank spacer components.
Margin adjustments are especially useful when stacking multiple text blocks on a step — you can tighten spacing between related content and add space before a new section.
---
Source: https://docs.teacharium.io/docs/build-your-lesson/images-and-media
# Add images and media
Use images to make your lessons visually engaging and easier to understand.
Video (Adding Images and Media): [https://www.youtube.com/watch?v=75d6IDbYVuM](https://www.youtube.com/watch?v=75d6IDbYVuM)
Images can stand alone on a step or live inside other components — like a multiple choice question where each answer option has its own image.
## Adding an image component
Drag an **Image** component from the sidebar onto your step canvas. A placeholder appears; click it to open the media picker and choose your image source.
## The media library
The media library is your central image store. Any image you upload is saved here and can be reused across lessons. You can also search your library by filename if you've built up a large collection.
To upload an image, open the media library and drag a file onto the upload area, or click to browse your computer. Supported formats include JPG, PNG, GIF, and SVG.
## Organizing media with folders
Folders keep a growing library tidy. They are shared by everyone in your organization and hold images, audio and videos together.
- **Create a folder** with **New folder** above the grid, or with the **+** next to **Folders** in the sidebar. Use a folder's **⋯** menu to add a subfolder, rename it, move it, or delete it.
- **File media** by dragging cards onto a folder in the sidebar (or onto a folder tile), or choose **Move to folder…** from a card's menu. To move several at once, tick the checkbox on each card (Shift-click selects a range) and click **Move to…**. You can also change an item's folder in its details window.
- **Browse** by clicking a folder. You see everything in it, including its subfolders, and search stays inside the folder you're in. **All media** shows the whole library, and **Unfiled** shows items that aren't in any folder yet.
- **Upload into a folder** by opening it first. Uploads, AI-generated images and Unsplash photos are saved to the folder you're viewing.
- **Deleting a folder never deletes media.** Its items and subfolders move up to the folder above it.
Folders only organize the library. Moving an image or video doesn't change the lessons that use it.
The media pickers in the editor have the same folders and reopen in the last folder you used.
## Searching Unsplash
The media picker includes a built-in Unsplash search. Type a keyword and browse thousands of free, high-quality stock photos. Click any result to add it to your lesson — Teacharium handles attribution automatically.
This is useful when you need a quick contextual image and don't have your own assets handy.
## Generating images with AI
The media picker also includes an AI image generator. Describe the image you want and Teacharium generates it. This is handy for custom illustrations, abstract concepts, or visuals that don't exist as stock photos.
Generated images are saved to your media library so you can reuse them.
## Image layout options
Once an image is placed, the **Style** panel on the right gives you sizing and layout controls:
- **Width and height** — Set fixed dimensions or let the image fill its container
- **Object fit** — Control whether the image is cropped to fill its space or letterboxed
- **Border radius** — Round the corners for a softer look
## SVG graphics
The **Svg** component (in the **Media** group) draws a vector graphic from SVG markup. It's a good fit for diagrams, simple charts, labeled illustrations and icons, and it is what the AI assistant uses when you ask it to draw something.
- **Paste markup** into the component's **SVG** field, or click **Upload .svg** to load a file from your computer. The markup is stored with the component; it is not added to your media library.
- **Use variables** by writing `{{variableName}}` anywhere in the markup, for example `{{score}} points` or `width="{{percent}}"`. The graphic updates as the learner's variables change. `{{#if passed}}…{{/if}}` shows part of the graphic only when a variable is true.
- **Sizing**: if the SVG has a `viewBox`, it scales to fill the width of its grid cell. Set **Width** or **Height** to fix its size.
- **Alt text** describes the graphic for screen readers. Leave it empty for purely decorative graphics.
- For safety, scripts, event handlers (such as `onclick`) and embedded HTML are removed before the graphic is shown.
## Images inside other components
Some components support sub-components, meaning you can nest an image inside them. Multiple choice questions, for example, allow each answer option to contain an image instead of (or alongside) text.
To add an image inside a choice, select the choice content area and add an Image component there. This works the same as adding an image to the main canvas.
---
Source: https://docs.teacharium.io/docs/build-your-lesson/grid-layouts
# Using the Grid Layout
The grid layout system lets you divide a step into sections and place components precisely where you want them.
Video (Using the Grid Layout): [https://www.youtube.com/watch?v=0IdfasWqspw](https://www.youtube.com/watch?v=0IdfasWqspw)
Without a grid, components stack vertically from top to bottom. The grid lets you break out of that flow and place content side-by-side, create asymmetric layouts, or build structured multi-column designs.
## Enabling grid layout
Select a step and toggle **Grid Layout** in the step settings panel. This switches the step's content area from a stacked layout to a grid canvas.
## How the grid works
The step is divided into a 12-column, 12-row grid. When you draw a cell, you specify which columns and rows it occupies. Cells can span any number of columns or rows — a cell that spans all 12 columns fills the full width, while a cell spanning 6 columns takes up half.
You can draw as many cells as you need. Cells can't overlap, so the layout remains predictable.
## Drawing cells
In grid layout mode, click and drag on the canvas to draw a cell. Release to place it. The cell snaps to the grid so dimensions are always clean fractions of the step width and height.
After drawing, you can drag the edges of a cell to resize it or drag the cell itself to reposition it.
## Adding content to cells
Once a cell exists, drag components into it from the sidebar just as you would on a regular step. Multiple components can go inside the same cell — they stack vertically within the cell.
## Gap and border options
Select a cell to open its style options:
- **Gap** — Controls the space between cells. Increase it to add breathing room between columns or rows.
- **Border** — Add a visible border to a cell. You can set the color, width, and which sides show the border.
Borders are useful for visually separating sections of a step without needing extra components.
## AI-generated layouts
You can ask the AI assistant to create a grid layout for you. Describe the structure you want — "two columns, left side image right side text" or "header row then three equal columns" — and the AI will draw the cells and populate them with components.
This is faster than drawing cells manually when you have a clear layout in mind.
## Nesting grids
You can place a **Grid Layout** component inside a grid cell to create nested grids. This lets you build complex layouts where one section of a step has its own internal column structure.
Nesting is powerful but adds complexity — use it when you need a layout that a single flat grid can't express.
---
Source: https://docs.teacharium.io/docs/build-your-lesson/lesson-fonts
# Choose lesson fonts
Give your lesson its own look by choosing two fonts from [Google Fonts](https://fonts.google.com): a **decorative font** for headings and a **body font** for everything else.
## How the two fonts are used
| Font | Used for |
| ------------------- | --------------------------------------------------------------------------------------------------------------------------- |
| **Decorative font** | **Heading 1** and **Heading 2** |
| **Body font** | Everything else: paragraphs, Heading 3 and smaller, lists, buttons, answer choices, inputs, and the player's navigation bar |
You can set one font, both, or neither. Any font you leave on **Default font** keeps Teacharium's standard font:
- **Decorative font only:** your H1 and H2 headings use it, and everything else stays in the default font.
- **Body font only:** everything uses the body font, headings included.
## Choose your fonts
1. Open your lesson in the editor.
2. Open the **Lesson Settings** panel and expand **Appearance**.
3. Under **Fonts**, open **Decorative font (H1, H2)** and pick a font. Use the category menu to narrow the list to Google's categories (_Display_, _Serif_, _Handwriting_, and so on). Categories follow Google's classification, so a font you know may sit in a different category than you expect. Nunito, for example, is _Sans Serif_. If your search matches fonts in other categories, the picker tells you and lets you show them.
4. Open **Body font** and pick a font.
Search by name and each font name shows in its own typeface. Your choice saves right away, and a small preview under the pickers shows both fonts together.
To go back to the standard font, open the picker and choose **Default font**.
## Where your fonts appear
Your fonts are used everywhere Teacharium shows the lesson:
- **The editor canvas**: you see your fonts while you build each step
- **The text editor**: headings and body text in the text editing dialog use your fonts
- **Step preview** inside the editor
- **The lesson player** when you play the lesson
- **Hosted embeds** (the Embed SDK) and **LTI** launches in your LMS
The panels, toolbars and menus around your lesson keep Teacharium's normal font. Only lesson content changes.
> **Published versions:** learners see a [published version](https://docs.teacharium.io/docs/share-your-work/publishing.md) of your lesson. After changing fonts, publish a new version so embedded and LMS learners get the update.
### Exports and self-hosted players
If you [export a lesson](https://docs.teacharium.io/api-documentation/api/export-lesson.md) or a developer plays it with the [self-hosted player](https://docs.teacharium.io/api-documentation/self-hosted-embedding/fonts.md), the lesson remembers which fonts you chose, but **the font files aren't included**. Whoever hosts the lesson has to load the fonts on their page. Until they do, learners see a similar fallback font. Share the [Lesson Fonts developer guide](https://docs.teacharium.io/api-documentation/self-hosted-embedding/fonts.md) with them.
## Tips for choosing fonts
- **Keep the body font simple.** Learners read a lot of body text. Clear sans-serif fonts such as _Open Sans_, _Lato_, _Nunito_ or _Atkinson Hyperlegible_ (designed for readability), or a serif such as _Merriweather_, work well.
- **Have fun with headings.** Headings are short, so the decorative font can show more personality: try _Lobster_, _Fredoka_, _Baloo 2_ or _Playfair Display_.
- **Two fonts are plenty.** If you want just one font throughout, set only the body font.
- **Check your special characters.** Some decorative fonts don't include accented letters, symbols or non-Latin scripts. If a character is missing, the browser shows it in a fallback font.
- **Preview on a phone.** Thin or very ornate fonts can be hard to read on small screens.
## Fine-tuning with Custom CSS
You can make exceptions with **Custom CSS** (in **Lesson Settings**). Any font you set there wins over the lesson fonts. The Custom CSS editor's **Reference** panel lists the class for each step, such as `.step--quiz-time-2`.
Use a different heading font on one step by setting the `--tp-font-display` variable:
```css
.step--quiz-time-2 {
--tp-font-display: "Bungee", system-ui, sans-serif;
}
```
Use a different body font on one step:
```css
.step--poem-5 {
font-family: "Merriweather", Georgia, serif;
}
```
Restyle one heading level:
```css
h2 {
font-family: "Open Sans", sans-serif;
}
```
> Custom CSS applies in step preview and the player, but not on the editor canvas.
>
> Custom CSS can only use fonts that are loaded on the page. Your two lesson fonts are always loaded on Teacharium-hosted pages. To use another Google Font, add an `@import` line at the very top of your Custom CSS, for example `@import url("https://fonts.googleapis.com/css2?family=Bungee&display=swap");`.
### Text effects
The **Vintage** and **Techno** text effects in a text component's style settings use their own font. Inside that component they replace both lesson fonts, headings included.
## Privacy note
On Teacharium-hosted pages, the fonts download from Google Fonts' servers, so learners' browsers connect to Google to fetch them. Lessons that use the default font make no requests to Google Fonts. If your organization doesn't allow Google Fonts, keep the default font or self-host the lesson and serve the fonts yourself.
---
Source: https://docs.teacharium.io/docs/build-your-lesson/step-transitions
# Animate between steps
A step transition is the animation learners see each time they move from one step to the next. It applies to the whole lesson, so every step change uses the same animation.
## Choose a transition
1. Open your lesson in the editor.
2. Open the **Lesson Settings** panel and expand **Player Options**.
3. Under **Step Transition**, pick a transition.
Your choice saves right away. Open the lesson preview and move between steps to see it.
| Transition | What learners see | Good for |
| ----------- | --------------------------------------------------------- | --------------------------------------- |
| **None** | The next step appears instantly | Fast-paced practice and quizzes |
| **Fade** | The previous step fades out to reveal the next | Most lessons (the default) |
| **Slide** | The next step slides in over the previous one | Linear, story-like lessons |
| **Push** | The next step pushes the previous one off-screen sideways | Lessons that feel like turning pages |
| **Push Up** | The next step pushes the previous one up and off-screen | Lessons that flow like a scrolling feed |
| **Zoom** | The next step scales up into place | Visual lessons and big reveals |
| **Wipe** | The next step is revealed by a moving edge | Before-and-after comparisons |
New lessons start with **Fade**.
## Going back
Slide, push, push up and wipe play in reverse when a learner goes back to an earlier step, so the movement always matches the direction they are travelling.
## Reduced motion
Learners whose device is set to reduce motion see a simple fade instead of slide, push, push up, zoom or wipe.
## Component transitions
Step transitions move the whole step. To animate a single component as a step appears, select the component and set its **Transition In** instead. Both can be used together.
---
Source: https://docs.teacharium.io/docs/build-your-lesson/voice-and-narration
# Text to Speech Options
Add voice narration to your lessons using Teacharium's built-in text-to-speech.
Video (Text to Speech Options): [https://www.youtube.com/watch?v=WybPh0WqpSg](https://www.youtube.com/watch?v=WybPh0WqpSg)
There are three ways to add voice to a lesson. Each one suits a different use case — on-demand reading, automatic narration, or synchronized instruction sequences.
## Configuring voice settings
Before adding voiceovers, set your default voice in **Lesson Settings**. Open the settings panel and choose a voice and speaking speed. A preview button lets you hear the voice before committing. This setting applies to all voiceovers in the lesson unless overridden on individual components.
## Approach 1: On-demand voiceover on text
Any text component can have a read-aloud button attached to it. When a learner clicks the button, the text is read aloud using the lesson's configured voice.
To enable this, select a text component and turn on **Voiceover** in the component settings. A speaker icon appears on the component during playback. Learners choose when to listen.
This is the lightest-touch option — it adds audio access without interrupting learners who prefer to read.
## Approach 2: Voiceover component
The **Voiceover** component is a dedicated audio player that plays a text-to-speech clip. You write the script in the component settings, and the voice reads it back.
Two modes are available:
- **Autoplay** — The voiceover begins automatically when the step loads. Use this for guided narration where you want every learner to hear the introduction.
- **Manual** — A play button appears on the step and learners start the audio themselves.
You can combine the Voiceover component with other content on the same step so learners hear narration while viewing images, text, or questions.
## Approach 3: Instruction sequences
An instruction sequence pairs a voiceover script with a visual component — typically a slide deck. As each line of the script plays, the visual advances in sync.
This creates a slideshow-style narrated experience:
1. Add an **Instruction Sequence** component and write your script — each line becomes one "slide" of narration.
2. Add a **Slide Deck** component (or another display component) and bind its current slide variable to the instruction sequence's step variable.
3. As the narration advances through each line, the variable updates, and the slide deck shows the matching slide.
With **Autoplay** on, the sequence starts when the step loads. With it off, learners see a **Start** button and the sequence plays from there. Lines without audio stay on screen for about two seconds before the next one.
Instruction sequences work well for multi-step explanations where the visual should change as the narration progresses. The learner can pause, rewind, and replay individual lines.
---
Source: https://docs.teacharium.io/docs/build-your-lesson/creating-a-quiz
# Create your first quiz
Build a quiz step where learners answer questions, get feedback, and progress when they're done.
## Add question components
Navigate to the step where you want the quiz. Drag one or more question components onto the canvas from the sidebar — **Multiple Choice** is a good starting point.
For each Multiple Choice component:
1. Click the component to open its settings
2. Add your question text above the choices (as a Text component or inside the question itself)
3. Fill in the choice options
4. Mark the correct answer by toggling **Is Correct Answer** on the right choice
5. Optionally write per-choice **Feedback** for incorrect options — this message appears when a learner picks that wrong answer
## Choose a quiz flow
How learners submit and advance depends on which logic controller you add to the step.
**For a standard quiz** — Add a **Logic Quiz** widget. Learners complete all questions, click Next, see a brief correct/incorrect message, and the lesson automatically advances. This is the most common quiz setup.
**For practice with retries** — Add a **Logic Practice** widget instead. Learners can check their answers multiple times, see hints, and eventually have the correct answer revealed. Use this for learning activities rather than assessments.
**For a low-stakes check** — Enable the **Show Check Answer Button** on the question component itself and skip the logic controller. Learners check their answer when they're ready and can move on regardless of the result.
## Add a Logic Quiz widget
Drag a **Logic Quiz** component onto the step. In its settings:
- **Show Feedback** — Turn on to display a message after submission before advancing
- **Correct Feedback Message** — What learners see when all answers are correct
- **Incorrect Feedback Message** — What learners see when some answers are wrong
The Logic Quiz automatically detects all question items on the step, so you don't need to configure which questions it covers.
## Preview and test
Click **Preview** in the top bar and navigate to the quiz step. Try answering incorrectly to verify the feedback messages appear, then answer correctly to confirm progression works. Check that the Next button is disabled until all questions are attempted.
For more on question types and logic controllers, see [Adding Questions](https://docs.teacharium.io/docs/build-your-lesson/adding-questions.md).
---
Source: https://docs.teacharium.io/docs/build-your-lesson/adding-questions
# Adding Questions
Teacharium has several built-in question types. Each one pairs with a logic controller that determines how learners interact with it — how many tries they get, whether they see immediate feedback, and when they can move on.
Video (Question Types): [https://www.youtube.com/watch?v=xKv1LjBZIqg](https://www.youtube.com/watch?v=xKv1LjBZIqg)
## Question types
### Multiple Choice
The most common question type. Learners select one answer from a list of options. Each choice can contain text, images, or other rich content. You mark one (or more, for multi-select) as correct and optionally add per-choice feedback that appears when an incorrect option is selected.
See the [Multiple Choice reference](https://docs.teacharium.io/docs/reference/multiple-choice.md) for full configuration options.
### Matching
Learners drag answer tiles from a pool onto question stems. You provide the pairs (each stem with its correct answer) and can add extra distractor tiles to increase difficulty. Matching works well for vocabulary, definitions, and any content with paired relationships.
### Ordering
Learners drag a list of items into the correct sequence. Items are automatically shuffled when the step loads so each learner sees them in a different order.
### Matrix Choice
A grid of yes/no or true/false-style choices where each row is a separate statement or question. Matrix Choice handles multiple related questions in a compact format. For surveys or self-reflection activities where there's no right or wrong answer, enable **survey mode** to skip correctness tracking.
### This or That
Learners choose between two options presented side by side. Each option navigates to content or sets a variable. This or That works in column layout (options stacked) or row layout (options side by side).
## Logic controllers
Questions don't work alone — they need a logic controller on the same step to define the interaction flow. Different controllers suit different teaching goals.
### Logic Gateway
The most flexible controller. It disables the Next button until your criteria are met. You choose the criteria:
- **All Attempted** — Learners must interact with every question before proceeding (correct or not)
- **All Correct** — Learners must answer every question correctly before proceeding
- **Custom Condition** — Write your own condition using variables
Use Logic Gateway when you want learners to engage with all content before moving on.
### Check Answer button
For a simpler "submit and see" flow without a full controller, enable the **Show Check Answer Button** option on a Multiple Choice or Matching component. Learners click the button to evaluate their answer and see feedback. The Next button remains available regardless of the result.
### Logic Practice
A guided multi-attempt flow. Logic Practice gives learners a configured number of tries before revealing the correct answer. It also supports hints that appear progressively as learners keep trying. Use this for practice problems where you want learners to work through difficulty before seeing the solution.
### Logic Quiz
A single-submission quiz flow. Learners complete all questions on the step, then click Next to submit. The controller evaluates all answers, shows a brief feedback message (correct or needs review), and automatically advances to the next step. Use this for scored quiz steps.
## Putting multiple questions on one step
You can add more than one question component to a step. Logic Gateway, Logic Practice, and Logic Quiz all monitor every question item on the step — so placing two Multiple Choice questions on one step means the learner must handle both before the controller allows progression.
For detailed configuration options for each question type, see the [reference documentation](https://docs.teacharium.io/docs/reference/multiple-choice.md).
---
Source: https://docs.teacharium.io/docs/build-your-lesson/step-templates
# Step templates
Step templates let you save a step's layout and content so you can reuse it later.
Video (Step Templates): [https://www.youtube.com/watch?v=cygwhyzXF28](https://www.youtube.com/watch?v=cygwhyzXF28)
When you find yourself building the same kind of step repeatedly, templates save you the work of recreating it from scratch.
Templates are shared across your organization. Anyone on your team can use templates that others have saved.
## How templates work
A template captures everything in a step: the layout, components, text, images, and settings. When you apply a template to a step, it copies all that content into the step. The copy is independent of the original, so changes you make afterward won't affect the template or other steps that used it.
Each component gets a new unique ID when applied. This prevents conflicts if you use the same template multiple times in a lesson.
## Saving a step as a template
1. In the step list, hover over the step you want to save.
2. Click the menu button (three dots) and select "Save as Template."
3. Give your template a name. Pick something descriptive so others can find it, like "Quiz with image header" or "Two-column comparison."
4. Add a description if you want. This helps teammates understand when to use it.
5. Click Save.
The template now appears in the template browser for everyone in your organization.
## Applying a template to a step
1. Hover over the step you want to change.
2. Click the menu button and select "Apply Template."
3. Browse or search for the template you want.
4. Click on a template to see a preview.
5. Click "Apply Template" to copy its content into your step.
Applying a template replaces the step's current content. If the step already has content you want to keep, duplicate the step first.
## Example: Quiz step template
Say your organization creates a lot of lessons with quizzes that follow the same format: an image at the top, a question below it, and four answer choices. Rather than building this layout every time, you can template it.
Build one quiz step the way you want it. Include placeholder text like "Question goes here" and "Option A" for the choices. Save it as a template called "Standard quiz with image."
Next time you need this format, apply the template and replace the placeholders with your actual content. You keep the layout work you already did.
## Example: Welcome step template
Many lessons start with a similar structure: a title, an intro paragraph, and a learning objectives list. Create a template for this.
Build a step with your standard welcome layout. Add placeholder text like "\[Lesson title]" and "By the end of this lesson, you will be able to..." Save it as "Lesson welcome step."
When starting a new lesson, apply this template to your first step. Fill in the specifics. You get a consistent look across lessons without rebuilding the structure each time.
## Using templates with AI
The AI assistant knows about your templates. You can ask it to apply templates when generating content.
In the lesson chat, try:
- "Apply the quiz template to step 3"
- "What templates do I have available?"
- "Create a new step using the vocabulary drill template"
In step generation mode, the AI can also apply templates as part of building out a step. If you describe what you want and a template matches, mention it: "Use the two-column layout template."
## Tips
**Name templates clearly.** "Quiz v2 final" doesn't help anyone. "Multiple choice quiz with feedback" does.
**Keep templates focused.** A template that tries to handle every scenario becomes hard to customize. Make separate templates for different use cases.
**Update by replacing.** Templates can't be edited after creation. To update one, save a new version with the same name and delete the old one.
**Check the preview.** Before applying, look at the preview panel. Make sure the template has what you expect.
## Deleting templates
Any team member can delete templates. In the template browser, click the trash icon next to the template name.
If you're deleting a template someone else created, you'll see a warning. The deletion is permanent, so make sure no one else is relying on it.
---
Source: https://docs.teacharium.io/docs/make-it-interactive/branching-lessons
# Branching Lessons
Send learners down different paths through your lesson based on their choices or performance.
Video (Branching Lessons): [https://www.youtube.com/watch?v=PXLgpbMSZBA](https://www.youtube.com/watch?v=PXLgpbMSZBA)
Teacharium supports several branching approaches — from simple "click here to go there" navigation to complex conditional routing based on scores and variables.
## Action buttons
An **Action Button** lets you navigate to any specific step in the lesson when clicked. Add one to a step, set its action to **Navigate to Step**, and pick the target step from your lesson structure.
This is the simplest branching mechanism. Use it when you want a "Go to advanced content" or "Skip to the summary" button that bypasses the normal next/previous flow.
## Navigation choices
A **Navigation Choice** component presents two or more options the learner can click, each routing to a different step. This is the foundation of choose-your-own-adventure style lessons.
Add a Navigation Choice component, then configure each choice with a label and a target step. When the learner clicks a choice, they jump to that step — bypassing the steps in between.
Navigation choices pair well with variables. You can set a variable when a choice is made and then use that variable later in the lesson to show personalized content.
See the [Navigation Choice reference](https://docs.teacharium.io/docs/reference/navigation-choices.md) for configuration details.
## Conditional visibility
Not all branching requires navigation. Sometimes you want different content to appear on the same step based on what the learner has done. Use **visibility conditions** on components to show or hide them based on variable values.
For example, after a question step you might have three feedback components on the results step — each one only visible for a different score range. Every learner sees the same step but gets different content.
## Branching Logic controller
The **Branching Logic** widget on a step evaluates conditions and routes the learner to different next steps based on their values. This is automatic branching: the learner clicks Next, the controller checks your conditions in order, and navigates to the matching target.
Configure it with a list of conditions:
- Each condition has a logical expression (like `score >= 8` or `path == "advanced"`) and a target step
- Conditions are evaluated from top to bottom — the first matching condition wins
- Set a **Default Target** for learners who don't match any condition
Use Branching Logic when the routing decision should be invisible to the learner — they just click Next and the lesson routes them appropriately.
## The Flow Map
The **Flow Map** gives you a bird's-eye view of your lesson's branching structure. Open it from the editor toolbar to see all steps as nodes and all navigation connections as arrows.
Use the flow map to verify that every path leads somewhere sensible and that you haven't created dead ends. It's especially valuable in complex lessons with many branches.
## Building branching with AI
Branching lessons can be complex to structure manually. The AI assistant can help:
- Describe your branching scenario in the lesson abstract (e.g., "Learners make three choices that lead to different outcomes; paths rejoin at the debrief")
- Ask the AI to generate the lesson structure, and it will create steps with appropriate navigation connections
- Ask the AI to add or modify branches after the initial structure is created
For a complete walkthrough of building a branching lesson from scratch, see [Create a Branching Dialogue Lesson](https://docs.teacharium.io/docs/see-it-built/branching-dialogue.md).
---
Source: https://docs.teacharium.io/docs/make-it-interactive/variables-and-interactive-controls
# Variables and Interactive Controls
Use variables to connect components and create lessons that respond to learner input.
Video (Variables and Interactive Controls): [https://www.youtube.com/watch?v=g2TH-wStaCQ](https://www.youtube.com/watch?v=g2TH-wStaCQ)
A variable is a named value that persists across a lesson. Components can write to variables (a slider sets a value, a learner types their name) and other components can read from them (a text block displays the value, a visibility condition checks it).
## Creating a variable
Open the **Variables** tab in the lesson sidebar. Click **Add Variable** and give it a name. Variable names should be lowercase with no spaces — `score`, `userName`, `selectedPath` are all valid names.
You can set a default value if the variable should start with something specific.
## Binding controls to variables
Input components — like text inputs, number inputs, and sliders — have an **Output Variable** setting. Set it to a variable name, and whenever the learner changes the input, the variable updates automatically.
For example:
- A **Slider** with an output variable of `rating` updates `rating` as the learner drags
- A **Text Input** with an output variable of `userName` captures whatever the learner types
Some question components also track answers in variables. A Multiple Choice question can store the selected choice ID in a variable for use later in the lesson.
## Conditional visibility
Every component has a **Visibility Condition** setting. You can write a condition using variable values, and the component only appears when the condition is true.
Common patterns:
- Show a "Correct!" message only when `score >= 8`
- Show a hint block only after the learner has made an attempt: `attempts > 0`
- Show different feedback based on which path the learner chose: `selectedPath == "B"`
Conditions update in real time as variables change. If a learner earns enough points mid-step, the congratulations message appears immediately.
## Linking components together
Variables are how components communicate. A few examples:
**Fraction bar + slider** — A slider sets a `numerator` variable. A custom fraction bar widget reads `numerator` and updates its display in real time. The learner drags the slider and watches the visual respond.
**Score tracker** — Multiple choice questions add to a `score` variable. A results screen displays `Your score: {{score}}` and conditionally shows different feedback based on the score range.
**Personalized intro** — A text input on the first step captures the learner's name into `userName`. Every subsequent step can address them by name.
## Common patterns
**Show feedback after an attempt** — Add a question and a feedback text block. Set the feedback block's visibility condition to `attempted == true`. The block appears only after the learner submits.
**Display results based on score** — Create multiple result blocks, each with a different visibility condition (`score < 5`, `score >= 5 && score < 8`, `score >= 8`). Only the appropriate block appears on the results step.
---
Source: https://docs.teacharium.io/docs/see-it-built/branching-dialogue
# Create a Branching Dialogue Lesson
Build a branching scenario where learners make decisions that lead to different outcomes and personalized feedback. This walkthrough uses a paramedic emergency response scenario, but the same techniques apply to any dialogue-based or choose-your-own-adventure lesson.
## Try the lesson then see how it's built below
[Try it full screen →](https://docs.teacharium.io/sample-lessons/branching-dialogue.md)
Interactive lesson (open in a browser to try it): [https://docs.teacharium.io/sample-lessons/branching-dialogue](https://docs.teacharium.io/sample-lessons/branching-dialogue)
Video (Create a Branching Dialogue Lesson): [https://www.youtube.com/watch?v=0EB2QysXIzM](https://www.youtube.com/watch?v=0EB2QysXIzM)
## How this lesson is built
The lesson is structured around decision points: at each step the learner chooses between two or three options, and each choice routes them to a different next step. Paths eventually converge at a debrief screen that shows personalized feedback based on the choices made.
### Step design with templates
The first step in building this lesson is designing one "decision point" step with the right layout — a scenario description at the top and navigation choices below — and saving it as a template. Every subsequent decision step then uses that template, so the layout stays consistent without rebuilding it each time.
### Writing the lesson abstract
A detailed lesson abstract describes the full branching structure: the scenario, each decision point, what each choice represents, which step each choice leads to, and which variables track learner decisions. Writing this upfront lets the AI generate the full lesson structure — sections, steps, and variable definitions — in a single request rather than building steps one by one.
### Navigation choices and variable tracking
Each decision step uses a **Navigation Choice** component with options that navigate to different steps. Each choice also sets a variable (like `choice1` = "A" or "B") when selected. These variables accumulate as the learner moves through the lesson and are used on the final debrief screen to show what decisions were made.
### AI-assisted content generation
After the structure is scaffaolded, the AI generates content for each decision point step using the saved template. Multiple steps can be generated in a single batch request — describe the scenario context for each step and the AI fills in the text and choices while keeping the template layout.
### Verifying with the Flow Map
The **Flow Map** visualizes all steps as nodes and all navigation connections as arrows. After generation, the flow map makes it easy to confirm that every navigation choice points to the right next step and that no paths lead to dead ends.
### Conditional debrief screen
The final debrief uses visibility conditions to show different feedback based on the variables set during the lesson. Multiple feedback blocks sit on the same step, each with a condition tied to the learner's choices. Learners who made optimal decisions see a different message than those who chose a suboptimal path.
---
Source: https://docs.teacharium.io/docs/see-it-built/chemistry-simulation
# Build a Chemistry Simulation
What if your learners could pour chemicals, watch reactions happen, and learn from their mistakes — all inside a lesson? This project combines branching logic, custom widgets, and variables to build an acid-base titration simulation that responds to every learner action.
## Try the lesson then see how it's built below
[Try it full screen →](https://docs.teacharium.io/sample-lessons/acid-titration.md)
Interactive lesson (open in a browser to try it): [https://docs.teacharium.io/sample-lessons/acid-titration](https://docs.teacharium.io/sample-lessons/acid-titration)
Video (Build a Chemistry Simulation): [https://www.youtube.com/watch?v=luEyIHp7ojw](https://www.youtube.com/watch?v=luEyIHp7ojw)
## How this simulation is built
The simulation tracks how much acid a learner adds to a base solution. As the amount changes, a custom widget updates the visual — color, bubbling, pH indicator — in real time. Adding too much acid triggers a branching path to an "overshoot" outcome; reaching the equivalence point triggers a success path.
### Planning with variables
Before building any steps, the simulation variables are defined: `volumeAdded`, `currentPH`, `reactionState`. Every component and widget reads from or writes to these variables. Planning the variable schema upfront makes it easier to connect everything later.
### Custom widgets for interactive visuals
The titration flask is a custom widget built in the Widget Builder. It accepts the `volumeAdded` and `currentPH` variables as inputs and renders an animated flask whose color and appearance change with the values. This kind of visual — one that updates continuously based on calculations — would be impossible with standard components but is straightforward to build as a custom widget.
### Branching based on calculated values
The simulation uses Branching Logic controllers to route learners to different outcomes based on variable values. When `currentPH` drops below a threshold, the controller routes to the overshoot step. When it hits the target range, it routes to the success step. Learners experience consequences for their choices without the author having to manually wire every possible outcome.
### Testing with the debug panel
Simulations are complex — it's easy for a variable to be off by one or a condition to trigger at the wrong time. The **Debug Panel** (available in preview mode) shows all current variable values in real time as you interact with the lesson. This makes it straightforward to verify that variables are updating correctly and that branching conditions fire when expected.
---
Source: https://docs.teacharium.io/docs/see-it-built/learning-inventory
# Create a Learning Inventory with Teacharium AI
Build a learning inventory — a survey-style lesson that assesses how learners prefer to learn, then visualizes their results. This walkthrough shows how to use AI to generate the questions, manage variables, and create a results screen.
## Try the lesson then see how it's built below
[Try it full screen →](https://docs.teacharium.io/sample-lessons/learning-inventory.md)
Interactive lesson (open in a browser to try it): [https://docs.teacharium.io/sample-lessons/learning-inventory](https://docs.teacharium.io/sample-lessons/learning-inventory)
Video (Create a Learning Inventory with Teacharium AI): [https://www.youtube.com/watch?v=uMtSvJ9-IlM](https://www.youtube.com/watch?v=uMtSvJ9-IlM)
## How this lesson is built
The inventory presents a series of "This or That" questions across several learning style categories. Each answer increments a category variable. At the end, a radar chart displays how the learner's responses distribute across categories.
### Lesson abstract and variables
The lesson abstract describes the inventory's categories (visual, auditory, reading/writing, kinesthetic) and explains that each question maps to one of them. The AI uses this context to generate questions that are well-distributed across categories and to define the category variables.
Variables are created upfront — one per category — each starting at zero. Every question answer increments the matching category variable.
### Generating questions with AI
The AI generates the full set of This or That questions based on the abstract. Each question presents two options representing different learning preferences. The AI assigns each option to a category and wires up the variable increment action automatically.
After generation, questions can be reordered, duplicated, or edited individually. AI commands like "duplicate the last 5 steps" make it easy to add more questions without rebuilding them.
### This or That component
The **This or That** component presents two choices side by side. Each choice can trigger an action when selected — in this lesson, selecting a choice increments the corresponding category variable. The component supports auto-advance, so selecting an answer immediately moves to the next step without requiring a button click.
### Results visualization
The final screen uses a radar chart widget (built in the [companion video](https://docs.teacharium.io/docs/see-it-built/results-widget.md)) that reads the category variables and renders a polygon showing the learner's profile. The learner sees how their responses distribute across all categories at a glance.
For the results widget build, see [Build a Custom Results Widget](https://docs.teacharium.io/docs/see-it-built/results-widget.md).
---
Source: https://docs.teacharium.io/docs/see-it-built/results-widget
# Build a Custom Results Widget
Your learning inventory captures learner preferences — now give them something beautiful to look at. In this guide, you'll build a custom radar chart widget that visualizes each learner's results on their final screen.
This picks up right where [Create a Learning Inventory](https://docs.teacharium.io/docs/see-it-built/learning-inventory.md) left off.
## Try the lesson then see how it's built below
[Try it full screen →](https://docs.teacharium.io/sample-lessons/learning-inventory.md)
Interactive lesson (open in a browser to try it): [https://docs.teacharium.io/sample-lessons/learning-inventory](https://docs.teacharium.io/sample-lessons/learning-inventory)
Video (Build a Custom Results Widget): [https://www.youtube.com/watch?v=xdunAqVpnsE](https://www.youtube.com/watch?v=xdunAqVpnsE)
## How this widget is built
Custom widgets in Teacharium are created using the Widget Builder — you describe what you want in plain language, and the AI generates the component code. No programming knowledge is required.
### Creating the widget
Open the **Widget Library** from the sidebar and click **Create Widget**. Describe the radar chart: the number of axes, what each axis represents, the visual style. The AI generates a React component that renders the chart.
From there, refine it through conversation: adjust colors, change the scale, add labels, tweak the layout. Each refinement regenerates just the part you asked to change.
### Configuring widget fields
Widgets can expose configurable fields that appear in the lesson editor's settings panel. For this radar chart, each axis value is a field — so an author can wire each field to a lesson variable without editing any code.
In the Widget Builder, define the fields (one per learning style category). Each field becomes an input the lesson editor can connect to a variable.
### Publishing and enabling the widget
Once the widget looks right, publish it from the Widget Builder. Then open the lesson's **Widget Settings** and enable the new widget to make it available in the component sidebar.
### Wiring to variables
Add the radar chart widget to the results step. In the settings panel, connect each field to the corresponding category variable from the lesson. When the step loads during playback, the widget reads the live variable values and renders the chart with the learner's actual data.
This is the pattern for any widget that needs to display learner-specific results: expose fields in the widget, wire them to variables in the lesson.
---
Source: https://docs.teacharium.io/docs/see-it-built/cuban-missile-crisis
# Build a Cuban Missile Crisis Lesson
Build a historical decision-making scenario where learners step into the role of President Kennedy during the Cuban Missile Crisis. This walkthrough shows how to create a branching narrative where each choice affects the outcome of the crisis.
**Coming soon** — A detailed walkthrough of how this lesson is built is on the
way. In the meantime, try the lesson below!
## Try the lesson
Interactive lesson (open in a browser to try it): [https://docs.teacharium.io/sample-lessons/cuban-missile-crisis](https://docs.teacharium.io/sample-lessons/cuban-missile-crisis)
[Try it full screen →](https://docs.teacharium.io/sample-lessons/cuban-missile-crisis.md)
---
Source: https://docs.teacharium.io/docs/share-your-work/publishing
# Publishing & delivering lessons
When your lesson is ready for learners, you can publish it directly from the lesson editor. Each published version is a snapshot of your lesson at that point in time, so you can keep editing without affecting what learners see.
## Publish a version
1. Open your lesson in the editor.
2. In the left toolbar, click the **Lesson Delivery** icon (the upload arrow at the bottom).
3. Click **Publish New Version**.
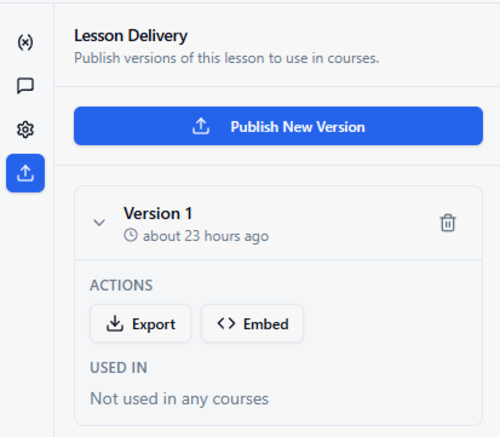
4. Optionally add version notes describing what changed, then click **Publish Version**.
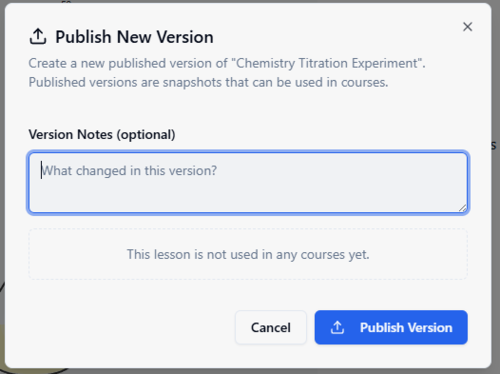
Each version is timestamped so you can track when it was published. You can publish as many versions as you need — learners always get the latest.
## Deliver your lesson
Once a version is published, you have two options for getting it to learners:
### Embed (hosted by Teacharium)
Click **Embed** on any published version to get everything you need to add the lesson to your website or LMS. The dialog provides your lesson and version IDs, server-side token generation code, and client-side embed code using the `@teacharium/embed-sdk`.
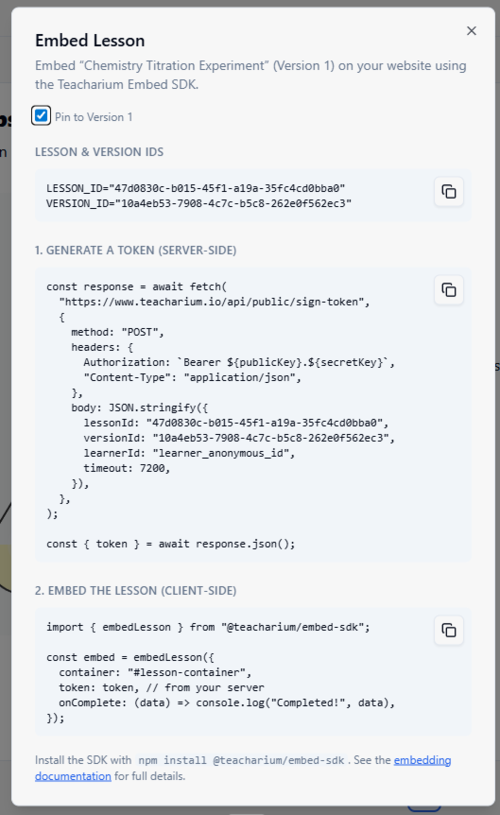
For full details on embedding, see the [embedding documentation](https://docs.teacharium.io/api-documentation/hosted-embedding.md).
### Export (self-hosted)
Click **Export** to download the published lesson data. Use this with the [Player SDK](https://docs.teacharium.io/api-documentation/hosted-embedding.md) to host and render lessons in your own application, giving you full control over the experience.
---
Source: https://docs.teacharium.io/docs/share-your-work/embedding
# Embed in your site
Deliver lessons directly within your website or application using Teacharium's embedding options.
For full technical details on embedding, see the [Developer Documentation](https://docs.teacharium.io/api-documentation.md):
- [Hosted Embedding](https://docs.teacharium.io/api-documentation/hosted-embedding.md) — Teacharium hosts the player for you. Add an iframe and you're done.
- [Self-Hosted Embedding](https://docs.teacharium.io/api-documentation/self-hosted-embedding.md) — Host the player yourself for full control over the experience.
To track how learners are progressing through embedded lessons, see the [Get Learner Progress](https://docs.teacharium.io/api-documentation/api/get-learner-progress.md) API.
---
Source: https://docs.teacharium.io/docs/share-your-work/lti
# LTI integration
> This guide is coming soon. Teacharium supports LTI (Learning Tools Interoperability) for connecting lessons directly to your LMS.
---
Source: https://docs.teacharium.io/docs/share-your-work/bring-your-own-agent
# Bring your own agent
Connect the AI agent you already use, such as Claude Code, Claude.ai, Codex, or Cursor, to Teacharium and let it build and revise your lessons for you.
Teacharium runs an MCP server (Model Context Protocol, the standard way AI agents connect to other apps). Once your agent is connected, it can do what the built-in Teacharium assistant does, and more: create a lesson, read a lesson, add sections and steps, build step content, update the abstract and variables, and use your step templates. Everything it does is saved to your lesson as if you had made the change in the editor.
Server address:
```text
https://app.teacharium.io/api/mcp
```
## Connect your agent
Pick your AI client:
Add the Teacharium server from your terminal:
```bash
claude mcp add --transport http teacharium https://app.teacharium.io/api/mcp
```
Then type `/mcp` in Claude Code, choose **teacharium**, and sign in.
Or install the Teacharium plugin, which adds the server and the two [authoring skills](#agent-skills) in one step. See [Install the skills](#install-the-skills).
1. Open **Settings** and go to **Connectors**.
2. Click **Add custom connector**.
3. Name it `Teacharium` and paste the server address.
4. Click **Connect**, then approve access on the Teacharium consent page.
To add the authoring skills too, see [Install the skills](#install-the-skills).
Add the Teacharium server from your terminal:
```bash
codex mcp add teacharium --url https://app.teacharium.io/api/mcp
```
Codex opens your browser so you can sign in. If it doesn't, run `codex mcp login teacharium`.
Or install the Teacharium plugin, which adds the server and the two [authoring skills](#agent-skills) in one step. See [Install the skills](#install-the-skills).
Custom connectors in ChatGPT need **Developer Mode**, available on Pro, Team, Enterprise, and Edu plans.
1. Open **Settings** > **Connectors** > **Advanced** and turn on **Developer mode**.
2. In **Settings** > **Connectors**, click **Create**.
3. Name it `Teacharium`, paste the server address, and choose **OAuth** authentication. ChatGPT discovers the sign-in settings automatically, so leave the client ID and secret empty.
4. Approve access on the Teacharium consent page.
5. In a conversation, enable the Teacharium connector from the tools menu.
The server also provides `search` and `fetch` tools, so Teacharium works in ChatGPT's search and deep research modes too.
Open **Settings** > **MCP** and add a new server with the address above, or add Teacharium to `~/.cursor/mcp.json` (or `.cursor/mcp.json` in a project):
```json
{
"mcpServers": {
"teacharium": { "url": "https://app.teacharium.io/api/mcp" }
}
}
```
Cursor shows a login prompt for the server the first time you use it.
Use the same configuration:
```json
{
"mcpServers": {
"teacharium": { "url": "https://app.teacharium.io/api/mcp" }
}
}
```
Any MCP client that supports Streamable HTTP with OAuth 2.1 and dynamic client registration can connect. Clients that only support local (stdio) servers can connect through `mcp-remote`:
```bash
npx -y mcp-remote https://app.teacharium.io/api/mcp
```
## Signing in and approving access
When your agent connects for the first time, your browser opens Teacharium:
1. Log in to Teacharium if you aren't already.
2. The consent page shows which application is asking for access.
3. Click **Approve** to let the agent work on your behalf, or **Deny** to cancel.
The agent then works as you. It can see and change the same lessons you can in your organization, and nothing more. You don't need to create or paste an API key.
To see which agents have access, or to disconnect one, open **Settings** in Teacharium and go to **Connected agents**. Click **Revoke** next to an agent to remove its access. The same settings page also shows the server address and the Claude Code setup command.
## What your agent can do
- **Create lessons**: start a new lesson with a title, tags, and abstract, optionally in a folder such as `Science/Biology`. Folders that don't exist yet are created for you.
- **Understand a lesson**: its sections and steps, the abstract, variables, recent templates, and which components (widgets) the lesson can use.
- **Change the structure**: create, rename, reorder, move, duplicate, and delete sections and steps.
- **Edit lesson details**: the title, tags, abstract, and variables.
- **Style the lesson**: read and change the lesson's custom CSS, the stylesheet from **Lesson Settings** that applies to every step (tools `get_custom_css`, `update_custom_css`, and `edit_custom_css`). Agents are told which Teacharium selectors to target and never to hide the lesson navigation.
- **Build step content**: lay out the step grid, then add, edit, move, and remove components. Content is checked against each component's settings before it's saved, just like the editor.
- **Use templates**: find a step template, apply it, or save a finished step as a new template for your team.
- **Undo**: list a step's earlier versions and restore one.
A good way to start is to ask your agent to read the lesson and its abstract first, for example: _"Read my Photosynthesis lesson and add a three-step introduction for 5th graders."_
## Previewing the result
Your agent can ask Teacharium for a **preview link** for a single step or the whole lesson. The link opens the current draft in the lesson player without logging in, so agents with a browser tool can look at what they built and fix problems on their own. You can open the same link yourself.
Preview links expire after a short time. Don't share them publicly.
## Staying safe
- **Deletions need confirmation.** Deleting a section, step, or variable, replacing a step's whole content, and restoring an older version of a step only happen when the agent explicitly confirms. Agents are instructed to ask you first.
- **Open editors are respected.** If someone else has the lesson open in the editor, the agent's changes are refused until they close it. If _you_ have it open, changes are saved but your editor won't show them until you reload the page.
- **No lost edits.** The agent sends the version of the step it last read. If the step changed in the meantime, the save is refused and the agent re-reads the step before trying again.
- **History is kept.** Every change to a step is saved in its history, and every abstract or custom CSS change keeps the previous version.
## Agent skills
Skills give your agent Teacharium know-how: how lessons are structured, how to write good steps, the step grid, text formatting, variables, and actions. They come from the same instructions the built-in Teacharium assistant uses.
- `teacharium-lessons`: lesson structure, the recommended workflow, and safety rules.
- `teacharium-step-content`: building the content of individual steps.
### Install the skills
The skills are published in the public [teacharium/agent-skills](https://github.com/teacharium/agent-skills) repository on GitHub. Claude, Codex, and several other agents can install it as a plugin, which adds both skills and the Teacharium server.
From your terminal:
```bash
claude plugin marketplace add teacharium/agent-skills
claude plugin install teacharium@teacharium
```
Or in one step inside Claude Code (version 2.1.275 or later):
```text
/plugin install teacharium --marketplace teacharium/agent-skills
```
Then type `/mcp`, choose **teacharium**, and sign in.
To get skill updates automatically, open `/plugin`, go to **Marketplaces**, select **teacharium**, and turn on auto-update. Or run `claude plugin update teacharium@teacharium`.
If you installed the plugin before November 2026 from `https://docs.teacharium.io/claude/marketplace.json`, it keeps working and updates from the new repository.
1. In Claude, go to **Customize** > **Plugins** > **Add** > **Add marketplace**.
2. Enter `teacharium/agent-skills`.
3. Install the **Teacharium** plugin.
4. On the plugin's **Connectors** tab, connect **Teacharium** and approve access on the Teacharium consent page.
Plugins you install in Claude also appear in Claude Code.
From your terminal:
```bash
codex plugin marketplace add teacharium/agent-skills
codex plugin add teacharium@teacharium
```
Or type `/plugins` inside Codex and install **Teacharium** from the list. Sign in to Teacharium when Codex asks. Codex checks for plugin updates each time it starts.
Install the skills with the [`skills`](https://github.com/vercel-labs/skills) command. It finds the agents on your computer (Cursor, VS Code, Gemini CLI, opencode, and many more) and asks which ones to install to:
```bash
npx skills add teacharium/agent-skills -g
```
Leave out `-g` to install into the current project only. Run `npx skills update` to get skill updates. Then [connect the server](#connect-your-agent) in your agent.
GitHub Copilot CLI and Gemini CLI can install the whole plugin instead:
```bash
copilot plugin marketplace add teacharium/agent-skills
copilot plugin install teacharium@teacharium
```
```bash
gemini extensions install https://github.com/teacharium/agent-skills --auto-update
```
Agents that don't support skills can ask the server for the same guidance with its authoring guide tool.
Your agent can also read this documentation directly. Point it at [llms.txt](https://docs.teacharium.io/llms.txt), an AI-readable index of every page, or [llms-full.txt](https://docs.teacharium.io/llms-full.txt) for the whole documentation in one file. Any page URL also works with `.md` added to the end.
---
Source: https://docs.teacharium.io/docs/reference/multiple-choice
# Multiple Choice
Create single- or multi-select questions with customizable choices and feedback. Multiple Choice items are versatile and work well for knowledge checks, quizzes, and assessments.
Interactive lesson (open in a browser to try it): [https://docs.teacharium.io/docs/reference/multiple-choice](https://docs.teacharium.io/docs/reference/multiple-choice)
## Use cases
- **Knowledge checks** – Test understanding of key concepts
- **Quiz questions** – Assess learning with single correct answers
- **"Select all that apply"** – Use multi-select mode for comprehensive questions
- **Practice exercises** – Combine with Logic Practice widget for guided learning
## Behavior
- **Single or multi-select** – Choose whether learners can select one answer or multiple answers
- **Rich choice content** – Each choice can contain text, images, or other content components
- **Immediate feedback** – Provide feedback for each choice when selected (if incorrect)
- **Check answer workflow** – Optionally show a "Check Answer" button for practice scenarios
- **Randomization** – Optionally randomize the order of choices for each learner
- **Variable tracking** – Tracks selected choices and correctness in variables
## Inputs
**Selection Mode** (Single Select / Multi Select)
- Choose whether learners can select one answer or multiple answers
- Single Select: Radio buttons (only one choice can be selected)
- Multi Select: Checkboxes (multiple choices can be selected)
**Choices** (array)
- List of answer choices for the question
- Each choice has:
- **Choice ID**: Auto-generated unique identifier
- **Choice Content**: Rich content (text, images, etc.) displayed as the choice option
- **Is Correct Answer**: Whether this choice is correct
- **Feedback**: Message shown when this incorrect choice is selected
- Default: 3 sample choices provided
**Show Check Answer Button** (Yes/No)
- Whether to display a "Check Answer" button
- If "Yes", learners click the button to check their answer
- If "No", answers are evaluated automatically (useful with Logic Quiz widget)
- Default: No
**Check Button Text** (text)
- Custom text for the check answer button
- Default: "Check Answer"
**Randomize Choice Order** (Yes/No)
- Whether to randomize the order of choices for each learner
- Helps prevent answer pattern recognition
- Default: No
---
Source: https://docs.teacharium.io/docs/reference/matching
# Matching
Ask learners to drag answers to matching question stems. Matching items are ideal for connecting related concepts, vocabulary, definitions, or any paired relationships.
Interactive lesson (open in a browser to try it): [https://docs.teacharium.io/docs/reference/matching](https://docs.teacharium.io/docs/reference/matching)
## Behavior
- **Drag and drop matching** – Learners drag answer choices from a pool to match question stems
- **Distractors** – Include extra answer choices that don't match any question
- **Visual feedback** – Shows correct/incorrect matches when checked
- **Check answer workflow** – Optionally show a "Check Answers" button to verify all matches
- **Variable tracking** – Tracks matches and correctness in variables
## Inputs
**Question & Answer Pairs** (array)
- List of matching pairs (question stems and their correct answers)
- Each pair has:
- **Question ID**: Auto-generated unique identifier for the question
- **Question Stem**: Rich content (text, images, etc.) displayed as the question
- **Answer ID**: Auto-generated unique identifier for the answer
- **Correct Answer**: Rich content (text, images, etc.) that matches this question
- Default: 2 sample pairs provided
**Distractors** (array)
- Extra answer choices that don't match any question
- Adds challenge by providing incorrect options
- Each distractor has:
- **Distractor ID**: Auto-generated unique identifier
- **Distractor Content**: Rich content (text, images, etc.) displayed as an answer option
- Optional: No distractors by default
**Show Check Answer Button** (Yes/No)
- Whether to display a "Check Answers" button
- If "Yes", learners click the button to verify all matches
- If "No", matching is evaluated automatically (useful with Logic Quiz widget)
- Default: Yes
**Check Button Text** (text)
- Custom text for the check answer button
- Default: "Check Answers"
**Correct Feedback** (text)
- Message shown when all matches are correct
- Default: "Great job! Every match is correct."
**Incorrect Feedback** (text)
- Message shown when some matches are incorrect
- Default: "Not quite right. Review each match and try again."
## Use cases
- **Vocabulary matching** – Match terms with definitions
- **Concept pairing** – Connect related ideas or concepts
- **Category matching** – Match items to their categories
- **Relationship mapping** – Connect causes and effects, problems and solutions, etc.
---
Source: https://docs.teacharium.io/docs/reference/ordering
# Ordering
Let learners drag items into the correct sequence. Ordering items are perfect for teaching chronological events, step-by-step processes, or any content that requires understanding sequence and order.
Interactive lesson (open in a browser to try it): [https://docs.teacharium.io/docs/reference/ordering](https://docs.teacharium.io/docs/reference/ordering)
## Behavior
- **Drag and drop** – Learners drag items to reorder them into the correct sequence
- **Visual feedback** – Items show correct/incorrect positioning when checked
- **Check answer workflow** – Optionally show a "Check Order" button to verify the sequence
- **Randomization** – Optionally randomize the initial order of items
- **Variable tracking** – Tracks the current order and correctness in variables
## Inputs
**Items to Order** (array)
- List of items that learners will arrange in sequence
- The order you add items is the correct order
- Each item has:
- **Item ID**: Auto-generated unique identifier
- **Item Content**: Rich content (text, images, etc.) displayed for the item
- Default: 3 sample items provided
**Show Check Answer Button** (Yes/No)
- Whether to display a "Check Order" button
- If "Yes", learners click the button to verify their sequence
- If "No", ordering is evaluated automatically (useful with Logic Quiz widget)
- Default: Yes
**Check Button Text** (text)
- Custom text for the check answer button
- Default: "Check Order"
**Correct Feedback** (text)
- Message shown when the order is correct
- Default: "Correct! Great job ordering the items."
**Incorrect Feedback** (text)
- Message shown when the order is incorrect
- Default: "Not quite right. Try reordering the items."
**Randomize Initial Order** (Yes/No)
- Whether to randomize the starting order of items
- Learners still need to arrange them correctly
- Default: No
## Use cases
- **Chronological events** – Order historical events, story sequences, or timelines
- **Process steps** – Arrange steps in a procedure or workflow
- **Priority ranking** – Order items by importance or priority
- **Sequential learning** – Teach concepts that build on each other in order
---
Source: https://docs.teacharium.io/docs/reference/fill-in-the-blank
# Fill in the Blank
Create questions where learners type an answer or select from a dropdown. Fill in the Blank items support text and numeric answers with flexible validation, including multiple accepted answers and numeric tolerance.
Interactive lesson (open in a browser to try it): [https://docs.teacharium.io/docs/reference/fill-in-the-blank](https://docs.teacharium.io/docs/reference/fill-in-the-blank)
## Behavior
- **Text or dropdown input** – Choose between a free-text input or a dropdown menu for answers
- **Text and numeric answers** – Accept typed text or numeric values with different validation rules
- **Multiple accepted answers** – Define additional correct answers beyond the primary one
- **Flexible validation** – Control case sensitivity, whitespace trimming, and numeric tolerance
- **Immediate feedback** – Show correct/incorrect feedback when the answer is checked
- **Check answer workflow** – Optionally show a "Check Answer" button for practice scenarios
- **Try again** – Learners can reset and try again after an incorrect answer
- **Display styles** – Five visual styles: Card, Inline, Underline, Minimal, and Filled
- **Variable tracking** – Tracks the current answer, correctness, and score in variables
## Inputs
**Input Mode** (Text Input / Dropdown)
- Choose whether learners type their answer or select from a dropdown
- Text Input: A text or number field where learners type freely
- Dropdown: A select menu with predefined options
**Display Style** (Card / Inline / Underline / Minimal / Filled)
- Controls the visual appearance of the input area
- Default: Card
**Input Size** (Small / Medium / Large / Full Width)
- Controls the width of the input field
- Small: single word, Medium: short phrase, Large: longer phrase, Full Width: spans the container
- Default: Medium
**Placeholder Text** (text)
- Hint text shown inside the input before the learner types
- Default: "Type your answer..."
**Correct Answer** (text)
- The primary correct answer for the question
### Text Input Options
These options appear when Input Mode is set to Text Input.
**Answer Type** (Text / Numeric)
- Choose whether the answer is evaluated as text or a number
- Default: Text
**Additional Accepted Answers** (array)
- Extra answers that are also counted as correct
- Useful for synonyms, alternate spellings, or equivalent phrasings
**Case Sensitive** (Yes / No)
- Whether the answer comparison is case sensitive
- Default: No
**Trim Whitespace** (Yes / No)
- Whether to ignore leading and trailing whitespace when comparing answers
- Default: Yes
#### Numeric Options
These options appear when Answer Type is set to Numeric.
**Allow Decimal** (Yes / No)
- Whether to allow decimal numbers
- Default: Yes
**Numeric Tolerance** (number)
- How far the learner's answer can be from the correct answer and still be accepted
- Example: Correct answer is 3.14, tolerance is 0.01, so 3.13–3.15 are all accepted
- Default: 0
**Minimum Value** / **Maximum Value** (number)
- Constrains the accepted range for the numeric input
- Default: 0 – 1,000,000
#### Text Length Options
These options appear when Answer Type is Text.
**Minimum Length** / **Maximum Length** (number)
- Constrains the character length of the learner's answer
- Default: 0 – 500
### Dropdown Options
These options appear when Input Mode is set to Dropdown.
**Dropdown Options** (array)
- The list of choices shown in the dropdown menu
- Each option has an ID and a display label
- The Correct Answer field should match one of these option labels or IDs
- Default: 3 sample options
### Feedback & Scoring
**Show Check Answer Button** (Yes / No)
- Whether to display a "Check Answer" button
- If "Yes", learners click the button to check their answer and can try again
- If "No", answers are evaluated automatically (useful with Logic Quiz widget)
- Default: Yes
**Check Button Text** (text)
- Custom text for the check answer button
- Default: "Check Answer"
**Correct Feedback** (text)
- Message shown when the answer is correct
- Default: "Correct!"
**Incorrect Feedback** (text)
- Message shown when the answer is incorrect
- Default: "That's not quite right. Try again."
**Max Score** (number)
- Points awarded for a correct answer
- Default: 1
## Use cases
- **Vocabulary recall** – Ask learners to type a definition or term from memory
- **Math problems** – Use numeric mode with tolerance for calculations (e.g., accept 3.14 ± 0.01)
- **Spelling practice** – Enable case sensitivity and disable whitespace trimming for exact answers
- **Dropdown quizzes** – Use dropdown mode when you want to limit answers to specific options
- **Fill-in-the-sentence** – Use the inline display style to embed the input within a sentence in the question prompt
- **Short answer questions** – Accept multiple valid phrasings with additional accepted answers
---
Source: https://docs.teacharium.io/docs/reference/cloze-question
# Cloze Question
A cloze question (also known as fill-in-the-blanks) presents learners with a passage of text containing one or more blank spaces. Learners must fill in the correct words or phrases to complete the passage.
Interactive lesson (open in a browser to try it): [https://docs.teacharium.io/docs/reference/cloze-question](https://docs.teacharium.io/docs/reference/cloze-question)
## Features
- **Multiple blank modes**: Choose from dropdown, text input, or drag-and-drop
- **Flexible configuration**: Each blank can have its own correct answer and distractors
- **Customizable sizing**: Control the width of each blank independently
- **Text matching options**: Configure case sensitivity and whitespace trimming for text input mode
- **Word bank**: Drag-and-drop mode automatically creates a shuffled word bank from correct answers and distractors
- **Immediate or deferred feedback**: Optional check button for manual answer submission
## Blank Modes
### Dropdown
Learners select from a dropdown menu containing the correct answer and distractors. The options are automatically shuffled for each blank.
### Text Input
Learners type their answers directly. You can configure whether answers are case-sensitive and whether to trim whitespace.
### Drag and Drop
Learners drag words from a word bank into the blanks. The word bank automatically includes all correct answers and distractors, with duplicates removed.
## Usage
1. **Add the widget** to your step
2. **Write your passage** using `[[1]]`, `[[2]]`, etc. to mark blank positions
3. **Configure each blank**:
- Set the correct answer
- Add distractor options (incorrect choices)
- Choose the blank width (small, medium, large, or extra large)
4. **Choose the blank mode** (dropdown, text input, or drag-and-drop)
5. **Set feedback messages** for correct and incorrect responses
6. **Configure scoring** by setting the max score value
## Example
```
The process of photosynthesis converts [[1]] and water into [[2]] and oxygen.
Blank 1: carbon dioxide (distractors: nitrogen, helium)
Blank 2: glucose (distractors: protein, lipids)
```
## Variables Published
Like all items, the Cloze Question publishes:
- `attempted` – Whether the learner has attempted the question
- `correct` – Whether all blanks are filled with correct answers
- `score` – Current score (maxScore if correct, 0 otherwise)
- `answer` – Learner's responses for each blank
## Customization Options
- **Font Size**: Small, medium, large, or extra large
- **Blank Width**: Individual width settings per blank (8ch, 14ch, 20ch, or 28ch)
- **Text Input Mode**:
- Case sensitive matching (yes/no)
- Trim whitespace (yes/no)
- **Check Button**: Enable/disable and customize button text
- **Feedback**: Custom messages for correct and incorrect responses
---
Source: https://docs.teacharium.io/docs/reference/matrix-choice
# Matrix Choice
Present a matrix question where each row selects from multiple answer columns. Matrix Choice items are perfect for evaluating multiple statements against the same set of answer options, such as true/false questions or rating scales.
Interactive lesson (open in a browser to try it): [https://docs.teacharium.io/docs/reference/matrix-choice](https://docs.teacharium.io/docs/reference/matrix-choice)
## Behavior
- **Grid-based selection** – Each row (question) selects from the same set of columns (answers)
- **Single selection per row** – Learners select one answer column for each question row
- **Two question types** – Choose between Correct/Incorrect or Rating mode
- **Survey mode** – Option to disable grading for survey-style questions
- **Per-row feedback** – Provide feedback for each row when incorrect
- **Overall feedback** – Show overall correct/incorrect feedback
- **Check answer workflow** – Optionally show a "Check Answers" button
- **Variable tracking** – Tracks selections and correctness in variables
## Inputs
**Question Type** (Correct/Incorrect or Rating)
- **Correct/Incorrect**: Traditional graded questions where each row has a correct answer
- **Rating**: Rating scale questions where each column has a score value
- In rating mode, all answered questions are considered correct
- Answers are recorded rather than graded: rows show no ✓/✗ marks, and the result reads "Responses recorded."
- Scores are assigned based on the selected column's score value
- Useful for Likert scales, satisfaction ratings, or preference surveys
- Default: Correct/Incorrect
**Answer Columns** (array)
- The answer options available for each row
- Minimum: 2 columns
- Each column has:
- **Column ID**: Auto-generated unique identifier
- **Column Header**: Rich content (text, images, etc.) displayed as the column header
- **Score**: Numeric score for Rating mode (e.g., 1 for "Poor", 5 for "Excellent")
- Default: 2 columns (True/False)
**Question Rows** (array)
- List of questions that learners answer using the answer columns
- Each row has:
- **Row ID**: Auto-generated unique identifier
- **Row Question**: Rich content (text, images, etc.) displayed as the question
- **Correct Column ID**: The ID of the correct answer column for this row
- **Incorrect Feedback**: Message shown when this row is answered incorrectly
- Default: 2 sample rows provided
**Show Check Answer Button** (Yes/No)
- Whether to display a "Check Answers" button
- If "Yes", learners click the button to verify their answers
- If "No", answers are evaluated automatically (useful with Logic Quiz widget)
- Default: Yes
**Check Button Text** (text)
- Custom text for the check answer button
- Default: "Check Answers"
**Survey Mode** (Enabled/Disabled)
- When enabled, the matrix is not graded (useful for surveys and opinion questions)
- When disabled, answers are evaluated for correctness
- Default: Disabled
**Overall Correct Feedback** (text)
- Message shown when all rows are answered correctly
- Default: "All responses are correct!"
**Overall Incorrect Feedback** (text)
- Message shown when some rows are answered incorrectly
- Default: "Some responses still need attention."
## Use cases
- **True/False questions** – Evaluate multiple statements as true or false (Correct/Incorrect mode)
- **Rating scales** – Rate multiple items using numeric scales (Rating mode)
- Example: Rate service quality from 1 (Poor) to 5 (Excellent)
- Example: Agreement scales from 1 (Strongly Disagree) to 5 (Strongly Agree)
- **Multiple evaluations** – Evaluate several items against the same criteria
- **Surveys** – Collect opinions or preferences without grading (Survey mode or Rating mode)
---
Source: https://docs.teacharium.io/docs/reference/this-or-that
# This Or That
Create preference-based choice questions where learners select one option from mutually exclusive alternatives. Each selection increments a variable associated with that option, perfect for building preference inventories, personality assessments, or "would you rather" scenarios.
Interactive lesson (open in a browser to try it): [https://docs.teacharium.io/docs/reference/this-or-that](https://docs.teacharium.io/docs/reference/this-or-that)
## Behavior
- **Radio-style selection** – Only one option can be selected at a time
- **Variable tracking** – Each option increments its associated numeric variable when selected
- **Automatic decrement** – Previously selected option's variable is decremented when switching
- **Boolean variables** – If an option's variable is a boolean, it is set to true when picked and back to false when another option replaces it
- **Rich option content** – Each option can contain text, images, or other content components
- **Practice item** – Reports as attempted (no correct/incorrect evaluation)
- **Flexible layout** – Display options vertically or horizontally
## How It Works
When a learner clicks an option:
1. The variable for that option increments by 1
2. If a different option was previously selected, its variable decrements by 1
3. The widget marks itself as "attempted"
This creates a running tally across multiple steps - perfect for preference inventories where you sum up categories at the end.
## Inputs
**Options** (array)
- List of mutually exclusive choices
- Each option has:
- **Option ID**: Unique identifier for the option
- **Option Content**: Rich content (text, images, etc.) displayed as the option
- **Variable**: The variable this option updates when selected: a number variable is counted up (and down when switching away), a boolean variable is set true (and false when switching away)
- Default: Two options ("This" with ThisCount, "That" with ThatCount)
**Layout Direction** (Vertical / Horizontal)
- How to arrange the options on screen
- Vertical: Options stacked in a column (default)
- Horizontal: Options arranged side-by-side
## Setup Requirements
**Before using this widget, you must:**
1. Create a variable for each option in your lesson: numeric to count selections, or boolean to record which option was picked
2. Initialize each variable to 0 (or your desired starting value)
3. Select these variables when configuring each option
## Use Cases
### 1. Preference Inventory
Build a multi-step assessment where learners indicate preferences and you calculate category totals at the end.
**Example: Learning Style Inventory**
Create variables:
- `VisualLearningScore` (number, initial: 0)
- `AuditoryLearningScore` (number, initial: 0)
- `KinestheticLearningScore` (number, initial: 0)
Over 10 steps, present different scenarios:
**Step 1:** "When learning new software, I prefer to..."
- Option 1: "Watch a tutorial video" → `VisualLearningScore`
- Option 2: "Listen to instructions" → `AuditoryLearningScore`
- Option 3: "Try it myself hands-on" → `KinestheticLearningScore`
**Step 2:** "I remember information best when I..."
- Option 1: "See diagrams or charts" → `VisualLearningScore`
- Option 2: "Hear it explained" → `AuditoryLearningScore`
- Option 3: "Practice the skill" → `KinestheticLearningScore`
After all steps, display the highest-scoring category to identify their dominant learning style.
### 2. Would You Rather Scenarios
Create engaging preference questions where learners choose between two options and you track their choices.
**Example: Career Path Explorer**
Create variables:
- `IndependentWorkScore` (number, initial: 0)
- `TeamWorkScore` (number, initial: 0)
**Multiple steps with scenarios:**
"Would you rather..."
- "Lead a solo project" → `IndependentWorkScore`
- "Collaborate with a team" → `TeamWorkScore`
"Would you rather..."
- "Work remotely from anywhere" → `IndependentWorkScore`
- "Work in a bustling office" → `TeamWorkScore`
Use the final scores to recommend career paths that match their work style preferences.
### 3. Product Recommendation Quiz
Help learners discover which product or service best fits their needs.
**Example: Course Track Selector**
Create variables for each track:
- `WebDevelopmentScore` (number, initial: 0)
- `DataScienceScore` (number, initial: 0)
- `MobileAppScore` (number, initial: 0)
Ask questions about interests and goals, incrementing the relevant track variable with each selection. Recommend the track with the highest score.
### 4. Character/Personality Assessment
Build personality quizzes or character assessments based on repeated choices.
**Example: Communication Style Quiz**
Create variables:
- `DirectCommunicatorScore` (number, initial: 0)
- `DiplomaticCommunicatorScore` (number, initial: 0)
Present scenarios and have learners choose their typical response, building a profile of their communication preferences.
## Best Practices
**Variable Naming**
- Use clear, descriptive names for your variables
- Example: `OutdoorActivitiesScore` instead of `Score1`
- This makes it easier to use variables in expressions later
**Number of Options**
- Works best with 2-4 options per question
- Too many options can overwhelm learners
- Consider breaking complex choices into multiple steps
**Tracking Results**
- Use the variable values in expressions to show running totals
- Display results on a final summary step
- Use conditional branching based on highest-scoring variable
**Visual Design**
- Use the horizontal layout for simple "this or that" questions
- Use the vertical layout when options have longer content
- Keep option content concise and scannable
## Tips
- **Initialize variables to 0** at the start of your lesson
- **Use expressions** like `{{VisualScore}} + {{AuditoryScore}} + {{KinestheticScore}}` to show total responses
- **Combine with BranchingLogic** to route learners based on their highest-scoring preference
- **Create a results step** that uses expressions to display each variable's value
- **Consider equal weight** - each question contributes equally since variables increment by 1
## Example Workflow
1. Create a lesson with a Variables section
2. Add numeric variables for each category (e.g., `Option1Count`, `Option2Count`)
3. Set initial values to 0
4. Add This Or That widgets to multiple steps
5. Map each option to its corresponding variable
---
Source: https://docs.teacharium.io/docs/reference/navigation-choices
# Navigation Choice
Present multiple navigation options that allow learners to choose their own path through a lesson. Navigation Choice widgets are perfect for choose-your-own-adventure scenarios, dialog systems, and branching narratives.
## Behavior
- **Interactive navigation** – Learners click on a choice to navigate to a specific step in the lesson
- **Rich choice content** – Each choice can contain text, images, icons, or other content components
- **Visual feedback** – Selected choices are highlighted to show the learner's decision
- **Flexible layout** – Display choices vertically or horizontally
- **Variable tracking** – Tracks the selected choice in a variable for use with other widgets
- **Disabled state** – Choices without a target step are automatically disabled
## Use cases
### Choose Your Own Adventure
Create interactive stories where learners make decisions that affect the narrative:
**Example scenario**: A leadership training module where learners face a team conflict. Present three navigation choices:
- **Choice 1**: "Address the conflict immediately in a team meeting" → navigates to Step 5 (immediate confrontation scenario)
- **Choice 2**: "Meet with team members individually first" → navigates to Step 6 (one-on-one conversations)
- **Choice 3**: "Observe the situation for a few more days" → navigates to Step 7 (wait-and-see approach)
Each path leads to different scenarios, consequences, and learning outcomes. Learners experience the results of their decision-making style.
### Dialog System
Build interactive conversations where learners respond to prompts with dialog options:
**Example scenario**: A customer service training module simulating a challenging phone call. The customer says: "I've been on hold for 30 minutes and I'm extremely frustrated!"
Present three navigation choices:
- **Choice 1**: "I sincerely apologize for the wait. Let me help you right away." → navigates to Step 10 (empathetic response path)
- **Choice 2**: "I understand. Can you tell me what you're calling about?" → navigates to Step 11 (solution-focused path)
- **Choice 3**: "Our wait times are longer than usual due to high call volume." → navigates to Step 12 (defensive response path)
Each response choice leads to different customer reactions and teaching moments about communication skills.
## Inputs
**Navigation Choices** (array)
- List of navigation options presented to the learner
- Each choice has:
- **Choice ID**: Auto-generated unique identifier
- **Choice Content**: Rich content (text, images, etc.) displayed as the choice option
- **Target Step**: The step to navigate to when this choice is selected
- Choices without a target step are shown as disabled (grayed out)
- Default: 3 sample choices provided
**Layout Direction** (Vertical / Horizontal)
- Choose how navigation choices are displayed
- Vertical: Choices stacked on top of each other (recommended for longer text)
- Horizontal: Choices displayed side-by-side (recommended for short options)
- Default: Vertical
## Tips for authors
- **Clear choices**: Write concise, distinct options that make the decision meaningful
- **Meaningful branches**: Ensure each choice leads to genuinely different experiences
- **Rejoin points**: Consider whether branching paths eventually rejoin or lead to different endings
- **Combine with variables**: Use the tracked "selectedChoice" variable with Logic widgets to create complex branching scenarios
- **Content in choices**: Take advantage of rich content - add icons, images, or formatting to make choices visually distinctive
- **Test all paths**: Preview your lesson and test each navigation path to ensure the experience flows correctly
---
Source: https://docs.teacharium.io/docs/reference/logic-gating
# Logic widgets
Logic widgets control the flow and behavior of your lessons.
They work behind the scenes to manage navigation, show/hide content, and orchestrate interactive experiences without displaying visible content to learners.
> **Warning:** It's not a good idea to mix multiple logic widgets on the same step. Unexpected results can occur.
## Logic Quiz
Use this widget on quiz steps where learners should attempt all questions before moving forward.
The widget automatically detects quiz items like Multiple Choice, Matching, or Matrix Choice widgets and monitors their completion.
### Behavior
- Monitors all quiz items on the step to check if they've been attempted
- Disables the Next button until all items are attempted
- Adds no Check or Submit button of its own: the Next button is the submit. Questions without their own Check button count as attempted as soon as they are answered.
- When the learner clicks Next:
- Evaluates whether all answers are correct
- Shows feedback (if enabled) with a success or review message and a Next button to continue
- Advances immediately if feedback is disabled
- Disables all items after submission (while showing feedback)
### Inputs
**Show Feedback** (Yes/No)
- Whether to display feedback messages after submission
- If "Yes", shows the feedback with a Next button; the learner continues from there
- If "No", advances immediately to the next step
**Correct Feedback Message** (text)
- The message displayed when all answers are correct
- Only shown if "Show Feedback" is enabled
- Default: "Great job! All answers are correct."
**Incorrect Feedback Message** (text)
- The message displayed when some answers are incorrect
- Only shown if "Show Feedback" is enabled
- Default: "Some answers need review. Let's move on."
---
## Logic Practice
Use this widget for practice problems where learners should have multiple attempts with guided support.
It's ideal for math problems, coding exercises, or any scenario where learners benefit from hints and seeing the correct answer after several tries.
### Behavior
- Monitors practice items to check if they've been attempted
- Disables the Next and Check Answer buttons until all items are attempted
- Shows a Hint button (if hints are configured)
- When the learner clicks Check Answer:
- If all answers are correct: shows success feedback and enables Next button
- If answers are incorrect: increments the attempt counter and shows feedback
- After maximum attempts: reveals correct answers and enables Next button
- Provides progressive hints that cycle through the hint list
- Has its own hints, so don't add a Logic Hint to the same step: both would respond to the Hint button
### Inputs
**Number of Tries** (number)
- How many times the learner can check their answer before seeing the solution
- After reaching this limit, correct answers are displayed
- Default: 3
**Hints** (array)
- A list of hint messages to show when the learner requests help
- Hints cycle through the list if requested multiple times
- Each hint has:
- **Hint Text**: The helpful message to display
- Default: 3 sample hints provided
**Correct Answer Feedback** (text)
- Message shown when the learner answers all items correctly
- Default: "Great job!"
**Show Answer Feedback** (text)
- Message shown when maximum attempts are reached and answers are revealed
- Default: "Good try, now look at the correct answer"
---
## Logic Hint
Use this widget when you want to offer hints to learners without the full practice flow. It adds a Hint button to the player navbar and cycles through your authored hints each time the button is clicked.
This is a good fit for any step where learners might need a nudge — informational pages, open-ended tasks, or steps that already use a Logic Gateway for progression control.
### Behavior
- Shows the Hint button in the player navbar when the step loads
- Each click on the Hint button displays the next hint in the feedback box
- Hints cycle back to the first one after the last hint is shown
- Hints appear with the "hint" style (yellow lightbulb) and auto-dismiss after 5 seconds
- During playback, the widget is invisible to learners
### Inputs
**Hints** (array)
- A list of hint messages displayed one at a time when the learner clicks the Hint button
- Hints cycle through the list, so learners can always re-read earlier hints
- Each hint has:
- **Hint Text**: The message to display
- Default: 3 sample hints provided
### Example Use Cases
- Provide scaffolded help on a difficult question without revealing the answer
- Give progressive clues that guide learners toward the correct approach
- Offer optional background context that learners can access if they need it
- Pair with a Logic Gateway to provide hints while gating progression separately
---
## Branching Logic
Use this widget when you want to create different learning paths based on learner responses, quiz scores, or other variable values. For instance, you might route struggling learners to review material while advancing others to new content.
### Behavior
- Evaluates conditions in order from top to bottom
- Routes the learner to the target step of the first condition that evaluates to true
- If no conditions match, routes to the default target step (if configured)
- Disables the Next button if no conditions match and no default is set
- During playback, the widget is invisible to learners
### Inputs
**Conditions** (array)
- Each condition has three parts:
- **Label**: A descriptive name for the condition (for your reference)
- **Condition**: The logical expression to evaluate (uses variable values)
- **Target Step**: The step to navigate to if this condition is true
**Default Target Step** (optional)
- The step to navigate to when no conditions match
- If left empty and no conditions match, the Next button will be disabled
---
## Logic Gateway
Use this widget when you need to control when learners can proceed to the next step.
Unlike Logic Quiz and Logic Practice which have predefined behaviors, Logic Gateway gives you flexible criteria to
enable the Next button based on item status or custom conditions.
### Behavior
- Initially disables the Next button when the step loads
- Enables the Next button when criteria are met
- Disables the Next button again if criteria become unmet
- With several Logic Gateways on one step, Next is enabled only when all of them are met
- During playback, the widget is invisible to learners
### Inputs
**Criteria** (radio selection)
Choose the condition that must be met before the Next button becomes enabled:
- **All Attempted**: All items on the current step must be attempted (at least one interaction)
- Useful when you want learners to try everything before moving on
- Doesn't require correct answers, just engagement with each item
- **All Correct**: All items on the current step must be answered correctly
- Ensures mastery before progression
- More strict than "All Attempted"
- Items must be both attempted and correct
- **Custom Condition**: Use a custom condition to determine when to enable the Next button
- Provides maximum flexibility
- Can evaluate variables, scores, or any other lesson data
- Example: Enable when a score variable exceeds a threshold
**Condition** (condition builder)
- Define your own logic using the condition builder
- Can compare variables, check values, or create complex expressions
- The Next button enables when this condition evaluates to true
### Example Use Cases
- Require learners to interact with all elements on a step before continuing
- Gate progression until all practice problems are solved correctly
- Enable navigation based on a calculated score or performance metric
- Create custom progression rules that don't fit the predefined logic widget patterns
---
## Run Action
Use this widget when you want to automatically execute an action once when a step loads. This is useful for setting up the initial state of a step, such as setting variables, controlling button states, or triggering other side effects without requiring learner interaction.
### Behavior
- Executes the configured action exactly once when the step loads
- Runs automatically without any learner interaction required
- Does not execute during editing (only during playback)
- Has no visual component - completely invisible to learners
- Ideal for setup tasks like initializing variables or configuring the UI
### Inputs
**Action to Run** (action)
- The action that will be executed when the step loads
- Can be any valid Teacharium action, such as:
- **setVariable**: Set a variable to a specific value
- **setNextButtonStatus**: Enable or disable the Next button
- **setNextButtonLabel**: Change the text on the Next button
- **setCheckAnswerButtonStatus**: Enable or disable the Check Answer button
- And any other supported action type
- The action runs only once per step visit
### Example Use Cases
- Set initial variable values at the start of a section
- Disable the Next button until certain criteria are met (combined with other widgets)
- Initialize the UI state for complex interactions
- Set custom button labels for context-specific navigation
---
Source: https://docs.teacharium.io/docs/reference/scoring-and-feedback
# Items overview
Items are interactive experiences that a user can work through
that you can add to your lessons to assess learner understanding and create engaging learning experiences.
## Premade item types
- **[Cloze Question](./cloze-question)** – Fill-in-the-blanks questions with dropdown, text input, or drag-and-drop modes
- **[Fill In The Blank](./fill-in-the-blank)** – Text input questions where learners type answers into blank fields
- **[Matching](./matching)** – Pair matching activities where learners connect items from two columns
- **[Matrix Choice](./matrix-choice)** – Grid-based questions where each row selects from multiple answer columns
- **[Multiple Choice](./multiple-choice)** – Single- or multi-select questions with customizable choices and feedback
- **[Ordering](./ordering)** – Drag-and-drop sequencing tasks where learners arrange items in the correct order
- **[This Or That](./this-or-that)** – Binary choice questions with visual options and customizable feedback
## Create your own
Use the widgets creation vibe-coding system to create your own widgets that are items to create more involved / interesting interactions for your learners.
## What does the Items system in teacharium do?
When you place a widget onto a step that is an item, it automatically registers itself with the items infrastructure. An
item will automatically publish variables for
- Has the item been attempted?
- Is the item currently correct?
- What feedback is currently appropriate?
These variables can be used for things like branching, hidding/showing feedback, or driving interactive models.
An item has a potential max score and a current score.
During lesson playback, the item system will record:
- A list of items, broken out by step, with all of the above information.
- An overall score & max-score for the steps that have been seen by the user.
During lesson playback, if the debug panel is available, you can see the list of items, their statuses and scoring information there.
---
Source: https://docs.teacharium.io/docs/reference/practice-and-hints
# Practice mode with hints
Give learners multiple attempts and progressive hints to master difficult material.
Practice mode changes a question from a one-shot assessment into a guided learning activity. Instead of submitting once and moving on, learners can check their answer, get feedback, try again, and eventually see the correct answer if they can't get it.
## Setting up the Logic Practice widget
Drag a **Logic Practice** component onto the same step as your question. The widget automatically detects all question items on the step.
Configure it in the settings panel:
**Number of Tries** — How many times the learner can check their answer before the correct answer is revealed. After reaching the limit, the lesson shows the solution and lets the learner continue. Default is 3.
**Hints** — A list of hint messages that appear one at a time when the learner clicks the Hint button. Write hints that progressively guide the learner toward the answer without giving it away immediately.
**Correct Answer Feedback** — The message shown when the learner answers correctly.
**Show Answer Feedback** — The message shown when the maximum tries are reached and the answer is revealed.
## How learners experience practice mode
1. The learner sees the question and a Check Answer button (the Next button is disabled)
2. They attempt an answer and click Check Answer
3. If correct: the correct feedback message appears and the Next button becomes available
4. If incorrect: the attempt counter increments, feedback appears, and they can try again
5. If they click the Hint button at any point, the next hint in the list is shown
6. After the maximum attempts, the correct answer is revealed and Next is enabled
## Using the Logic Hint widget standalone
The **Logic Hint** widget adds a Hint button to the player navigation bar without the full multi-attempt flow. Use it on any step — not just question steps — where learners might benefit from optional guidance.
Unlike Logic Practice, Logic Hint doesn't monitor questions or track attempts. It simply cycles through your hint list each time the learner clicks the button.
This is a good fit for:
- Informational steps where learners might get stuck on a concept
- Open-ended tasks without a single correct answer
- Steps using Logic Gateway for progression control, where you want to offer hints separately
## Choosing between Logic Practice and Logic Quiz
**Logic Practice** is for learning activities. Learners get multiple tries, see hints, and eventually see the answer. The goal is mastery, not measurement.
**Logic Quiz** is for assessments. Learners get one submission, receive brief feedback, and advance. The goal is evaluation.
Both are covered in more detail in the [Logic widgets reference](https://docs.teacharium.io/docs/reference/logic-gating.md).
---
Source: https://docs.teacharium.io/docs/reference/widget-library
# Widgets overview
Widgets are interactive elements you can add to your lessons to create engaging learning experiences. The widgets section keeps your organization's widgets separate from the public library so you can easily find and reuse what you need.
## Key features
- **My widgets** – All the widgets you and your team have created, with search and filter options.
- **Public widgets** – Browse the library of shared widgets for inspiration and reuse. Search and filter just like your own widgets.
- **Browse and organize** – Search by name, filter by tags, and sort your widgets. Switch between grid and list views.
- **Quick actions** – Create, edit, test, or delete widgets right from the listing.
Continue to the library guide to learn more about browsing and organizing widgets, or see the creating & editing guide to learn how to build and customize widgets.
---
Source: https://docs.teacharium.io/docs/support
# Support overview
Teacharium offers two types of support to help you get the most out of our platform.
## How to Get Help
Click the **Get help** button in the upper right corner of any Teacharium page to submit a support request. Describe your issue and we'll respond based on your support plan.
## Free Support
Free support is available to all users on a best-effort basis. Our team will respond to inquiries as time permits, though response times may vary depending on volume and complexity.
Free support includes:
- Community forums and documentation
- Bug reports and feature requests
- General usage questions
## Paid Support Plans
For priority assistance and guaranteed response times, paid support plans are available. Contact us to learn more about our enterprise support options, which include:
- Dedicated support channels
- Faster response times
- Custom onboarding and training
- Direct access to our technical team
To inquire about paid support plans, please [contact our sales team](mailto:support@teacharium.com).
---
Source: https://docs.teacharium.io/api-documentation
# Developer Documentation
## 🚧 Coming soon
The public API and hosted embedding isn't quite ready yet — we're actively working on it.
For timing, planned milestones, and progress updates, please check our public roadmap:
[View the public roadmap →](https://www.teacharium.io/roadmap)
If you'd like to influence priority or request specific features, join the waitlist or reach out via our support channels.
The Teacharium public API allows you to programmatically access your organization's lessons and integrate them into your applications.
## API
The Teacharium API provides programmatic access to your organization's lessons and enables embedding lessons in your applications.
### Getting Started
Before using the API, you'll need to:
1. **Create an API token** - Only organization administrators can create tokens. See [API Tokens](https://docs.teacharium.io/api-documentation/api/api-tokens.md) for instructions.
2. **Understand authentication** - All API requests require a Bearer token. See [Authentication](https://docs.teacharium.io/api-documentation/api/authentication.md) for details.
### API Reference
- [API Tokens](https://docs.teacharium.io/api-documentation/api/api-tokens.md) - Create and manage API tokens for authentication
- [Authentication](https://docs.teacharium.io/api-documentation/api/authentication.md) - Learn how to authenticate API requests
- [List Lessons](https://docs.teacharium.io/api-documentation/api/list-lessons.md) - Retrieve published lessons from your organization
### Embedding
- [Hosted Embedding](https://docs.teacharium.io/api-documentation/hosted-embedding.md) - Embed lessons on external websites using Teacharium's hosted infrastructure
- [Self-Hosted Embedding](https://docs.teacharium.io/api-documentation/self-hosted-embedding.md) - Deploy the TeachariumPlayer in your own application
- [Sign Token](https://docs.teacharium.io/api-documentation/api/sign-token.md) - Generate signed JWT tokens for embedding lessons
- [Embed Player Data](https://docs.teacharium.io/api-documentation/api/embed-player-data.md) - Retrieve lesson data for embedded players
## Common Concepts
### Authentication
All API endpoints require authentication using Bearer tokens. Tokens are organization-specific and consist of a public key and secret key.
[Read the full authentication documentation →](https://docs.teacharium.io/api-documentation/api/authentication.md)
### Response Format
All successful responses return JSON data with a consistent structure:
```json
{
"data": [...]
}
```
### Error Handling
Errors are returned with appropriate HTTP status codes and a JSON body:
```json
{
"error": "Error message description"
}
```
Common status codes:
- `401` - Authentication failed
- `422` - Invalid request parameters
- `500` - Internal server error
### Data Types
- **UUID**: String format `"550e8400-e29b-41d4-a716-446655440000"`
- **ISO 8601 Timestamps**: String format `"2025-01-15T10:30:00Z"`
- **Arrays**: Always returned as arrays, even if empty `[]`
## Support
If you encounter issues or have questions about the API, please contact support or check our [support documentation](https://docs.teacharium.io/docs/support.md).
---
Source: https://docs.teacharium.io/api-documentation/api
# API
The Teacharium API provides programmatic access to your organization's lessons and enables embedding lessons in your applications.
## Getting Started
Before using the API, you'll need to:
1. **Create an API token** - Only organization administrators can create tokens. See [API Tokens](./api-tokens) for instructions.
2. **Understand authentication** - All API requests require a Bearer token. See [Authentication](./authentication) for details.
## API Reference
- [API Tokens](./api-tokens) - Create and manage API tokens for authentication
- [Authentication](./authentication) - Learn how to authenticate API requests
- [List Lessons](./list-lessons) - Retrieve published lessons from your organization
- [Export Lesson](./export-lesson) - Export lessons as self-contained ZIP files
- [Sign Token](./sign-token) - Generate signed JWT tokens for embedding lessons
- [Embed Player Data](./embed-player-data) - Retrieve lesson data for embedded players
## Common Concepts
### Authentication
All API endpoints require authentication using Bearer tokens. Tokens are organization-specific and consist of a public key and secret key.
[Read the full authentication documentation →](./authentication)
### Response Format
All successful responses return JSON data with a consistent structure:
```json
{
"data": [...]
}
```
### Error Handling
Errors are returned with appropriate HTTP status codes and a JSON body:
```json
{
"error": "Error message description"
}
```
Common status codes:
- `401` - Authentication failed
- `422` - Invalid request parameters
- `500` - Internal server error
### Data Types
- **UUID**: String format `"550e8400-e29b-41d4-a716-446655440000"`
- **ISO 8601 Timestamps**: String format `"2025-01-15T10:30:00Z"`
- **Arrays**: Always returned as arrays, even if empty `[]`
---
Source: https://docs.teacharium.io/api-documentation/api/api-tokens
# API tokens
API tokens allow you to integrate Teacharium with your website or application. Only admins can create or revoke tokens, and the secret value is shown only once when you create it.
## Creating a token
- Click **Create token** to open the dialog. Provide a descriptive name so you can identify this token later.
- When the token is created, you'll see both the public and secret parts. Copy and store them immediately—the secret won't be shown again.
- Tokens are tied to your current organization. You must have an organization selected to create a token.
## Managing existing tokens
- Each token shows its status (active or revoked), public identifier, when it was created, when it was last used, and available actions.
- Use **Revoke** to immediately disable a token. Revoked tokens remain in the list for your records but can no longer be used.
- You can quickly copy the public identifier from each token.
## Error handling
- You'll see success or error messages when creating or revoking tokens.
- If something goes wrong, you'll see an alert explaining what happened so you can try again.
---
Source: https://docs.teacharium.io/api-documentation/api/authentication
# Authentication
All Teacharium public API endpoints require authentication using API tokens. Tokens are organization-specific and allow secure access to your organization's data.
## API Token Format
API tokens consist of two parts separated by a period (`.`):
```
tapub_xxxxx.tasec_xxxxx
```
- **Public Key**: Begins with `tapub_` and is used to identify the token
- **Secret Key**: Begins with `tasec_` and is used to verify the token
Both parts must be included when making API requests.
## Using API Tokens
Include your API token in the `Authorization` header using the Bearer authentication scheme:
```
Authorization: Bearer tapub_xxxxx.tasec_xxxxx
```
### Example Request
```bash
curl -X GET 'https://app.teacharium.io/api/public/lessons' \
-H 'Authorization: Bearer tapub_xxxxx.tasec_xxxxx'
```
### JavaScript/TypeScript Example
```javascript
const response = await fetch("https://app.teacharium.io/api/public/lessons", {
headers: {
Authorization: `Bearer ${publicKey}.${secretKey}`,
},
});
```
### Python Example
```python
import requests
headers = {
'Authorization': f'Bearer {public_key}.{secret_key}'
}
response = requests.get(
'https://app.teacharium.io/api/public/lessons',
headers=headers
)
```
## Creating API Tokens
Only organization administrators can create API tokens. To create a token:
1. Navigate to your organization settings
2. Go to the API Tokens section
3. Click **Create token**
4. Provide a descriptive name for the token
5. Copy both the public and secret keys immediately—the secret key will only be shown once
For detailed instructions, see [API Tokens](https://docs.teacharium.io/api-documentation/api/api-tokens.md).
## Token Security
- **Store securely**: Never commit tokens to version control or expose them in client-side code
- **Use environment variables**: Store tokens in environment variables or secure configuration management systems
- **One-time display**: Secret keys are only shown once when created. If lost, you must create a new token
- **Revoke when compromised**: If a token is compromised, revoke it immediately from your organization settings
- **Organization-scoped**: Tokens are tied to a specific organization and can only access that organization's data
## Authentication Errors
### 401 Unauthorized
The API returns a `401 Unauthorized` status when authentication fails.
#### Missing Authorization Header
```json
{
"error": "Missing authorization header"
}
```
**Cause**: The `Authorization` header is not included in the request.
**Solution**: Add the `Authorization` header with your Bearer token.
#### Invalid Token Format
```json
{
"error": "Authorization token must be provided as ."
}
```
**Cause**: The token is not formatted correctly (missing the period separator or one of the parts).
**Solution**: Ensure you're providing both the public and secret keys, separated by a period.
#### Invalid Token Scheme
```json
{
"error": "Authorization header must use the Bearer scheme"
}
```
**Cause**: The authorization scheme is not set to "Bearer".
**Solution**: Ensure your header starts with `Bearer ` followed by the token.
#### Invalid API Token
```json
{
"error": "Invalid API token"
}
```
**Possible causes:**
- The token does not exist in the system
- The secret key does not match the public key
- The token format is invalid (doesn't start with correct prefixes)
**Solution**: Verify you're using the correct token and that both parts are copied correctly.
#### Revoked Token
```json
{
"error": "API token has been revoked"
}
```
**Cause**: The token has been revoked and is no longer valid.
**Solution**: Create a new token from your organization settings.
### 500 Internal Server Error
```json
{
"error": "Failed to verify API token"
}
```
**Cause**: An unexpected error occurred while verifying the token.
**Solution**: Try again. If the problem persists, contact support.
---
Source: https://docs.teacharium.io/api-documentation/api/list-lessons
# List Lessons
Retrieve a list of published lessons from your organization.
## Endpoint
```
GET /api/public/lessons
```
## Authentication
This endpoint requires authentication using a Bearer token. See [Authentication](https://docs.teacharium.io/api-documentation/api/authentication.md) for complete details on API token format, usage, and error handling.
## Query Parameters
| Parameter | Type | Required | Description |
| --------- | ------- | -------- | ------------------------------------------------------------------------------- |
| `limit` | integer | No | Maximum number of lessons to return. Must be between 1 and 100. Defaults to 50. |
## Response
### Success Response (200 OK)
Returns a JSON object with a `data` array containing lesson objects.
```json
{
"data": [
{
"id": "550e8400-e29b-41d4-a716-446655440000",
"title": "Introduction to Biology",
"createdAt": "2025-01-15T10:30:00Z",
"updatedAt": "2025-01-20T14:45:00Z",
"tags": ["science", "biology", "intro"]
},
{
"id": "6ba7b810-9dad-11d1-80b4-00c04fd430c8",
"title": "Advanced Mathematics",
"createdAt": "2025-01-10T08:00:00Z",
"updatedAt": "2025-01-18T16:20:00Z",
"tags": ["math", "advanced"]
}
]
}
```
#### Lesson Object Fields
| Field | Type | Description |
| ----------- | ----------------- | ------------------------------------------ |
| `id` | string (UUID) | Unique lesson identifier |
| `title` | string | Lesson title |
| `createdAt` | string (ISO 8601) | Timestamp when the lesson was created |
| `updatedAt` | string (ISO 8601) | Timestamp when the lesson was last updated |
| `tags` | array of strings | Tags associated with the lesson |
### Error Responses
#### 401 Unauthorized
Authentication failed. See [Authentication Errors](https://docs.teacharium.io/api-documentation/api/authentication.md#authentication-errors) for detailed information on authentication issues.
#### 422 Unprocessable Entity
The query parameters are invalid.
```json
{
"error": "limit must be between 1 and 100"
}
```
**Possible causes:**
- `limit` parameter is not a number or is out of range (1-100)
- Invalid parameter format
#### 500 Internal Server Error
An unexpected error occurred on the server.
```json
{
"error": "Failed to load lessons"
}
```
## Example Requests
### Basic Request
Retrieve up to 50 published lessons (default behavior):
```bash
curl -X GET 'https://app.teacharium.io/api/public/lessons' \
-H 'Authorization: Bearer tapub_xxxxx.tasec_xxxxx'
```
### With Limit
Retrieve only 10 lessons:
```bash
curl -X GET 'https://app.teacharium.io/api/public/lessons?limit=10' \
-H 'Authorization: Bearer tapub_xxxxx.tasec_xxxxx'
```
## Notes
- Only published lessons are returned through the public API
- Lessons are ordered by `updatedAt` in descending order (most recently updated first)
- Only lessons belonging to your organization are returned
- Deleted lessons are automatically excluded from results
- The API uses pagination with a maximum limit of 100 lessons per request
---
Source: https://docs.teacharium.io/api-documentation/api/export-lesson
# Export Lesson
Export a published lesson version as a self-contained ZIP file containing all lesson content, media assets, and widget bundles.
> \[!NOTE]
> **EdTech Plan Required**
>
> Lesson export is available on **EdTech** plans only. Organizations on a Solo plan will receive a `403 Forbidden` response with the code `FEATURE_NOT_AVAILABLE`. Contact your organization admin to upgrade if you need export access.
## Endpoint
```
GET /api/lessons/{lessonId}/versions/{versionId}/export-zip
```
## Authentication
This endpoint requires authentication using a Bearer token. See [Authentication](https://docs.teacharium.io/api-documentation/api/authentication.md) for complete details on API token format, usage, and error handling.
## Path Parameters
| Parameter | Type | Required | Description |
| ----------- | ------------- | -------- | ---------------------------------------------- |
| `lessonId` | string (UUID) | Yes | The unique identifier of the lesson |
| `versionId` | string (UUID) | Yes | The unique identifier of the published version |
## Response
### Success Response (200 OK)
Returns a ZIP file as a binary download.
**Response Headers:**
| Header | Value |
| --------------------- | ------------------------------------------- |
| `Content-Type` | `application/zip` |
| `Content-Disposition` | `attachment; filename="lesson-slug-v1.zip"` |
| `Content-Length` | Size of the ZIP file in bytes |
### ZIP File Structure
The exported ZIP contains the following structure:
```
lesson-slug-v1/
├── lesson.json # Lesson content with localized media references
├── manifest.json # Export metadata and file inventory
├── styles/
│ └── custom.css # Lesson custom CSS (if the lesson has any)
├── media/
│ ├── {uuid}.jpg # Media files (images, videos, audio)
│ ├── {uuid}.png
│ └── ...
└── widgets/
├── {widget-id}.js # Widget JavaScript bundles
├── {widget-id}.css # Widget CSS files (if available)
└── ...
```
#### lesson.json
Contains the full lesson content structure. All media references are rewritten from `media:{uuid}` format to local paths (`./media/{uuid}.{ext}`).
#### manifest.json
Contains export metadata and file inventory:
```json
{
"lessonId": "550e8400-e29b-41d4-a716-446655440000",
"title": "Introduction to Biology",
"versionNumber": 1,
"versionId": "6ba7b810-9dad-11d1-80b4-00c04fd430c8",
"publishedAt": "2025-01-15T10:30:00Z",
"exportedAt": "2025-01-20T14:45:00Z",
"formatVersion": "1.0.0",
"files": {
"lesson": "./lesson.json",
"media": [
{
"id": "a1b2c3d4-e5f6-7890-abcd-ef1234567890",
"localPath": "./media/a1b2c3d4-e5f6-7890-abcd-ef1234567890.jpg",
"mimeType": "image/jpeg"
}
],
"widgets": [
{
"widgetType": "multiple-choice",
"localPath": "./widgets/widget-123.js",
"cssLocalPath": "./widgets/widget-123.css"
}
]
},
"fonts": {
"display": {
"family": "Lobster",
"category": "display",
"variants": ["400"],
"fontFamily": "\"Lobster\", system-ui, sans-serif"
},
"body": null,
"googleFontsUrl": "https://fonts.googleapis.com/css2?family=Lobster&display=swap"
},
"failedMedia": [],
"failedWidgets": [],
"attributions": [
{
"mediaId": "a1b2c3d4-e5f6-7890-abcd-ef1234567890",
"text": "Photo by John Doe",
"url": "https://unsplash.com/photos/abc123",
"portfolioUrl": "https://unsplash.com/@johndoe"
}
]
}
```
### Error Responses
#### 400 Bad Request
The path parameters are invalid.
```json
{
"error": "Bad Request",
"message": "Invalid lesson ID",
"code": "BAD_REQUEST",
"timestamp": "2025-01-20T14:45:00.000Z"
}
```
#### 401 Unauthorized
Authentication failed. See [Authentication Errors](https://docs.teacharium.io/api-documentation/api/authentication.md#authentication-errors) for detailed information.
```json
{
"error": "Authentication Error",
"message": "User authentication is required",
"code": "UNAUTHORIZED",
"timestamp": "2025-01-20T14:45:00.000Z"
}
```
#### 403 Forbidden
The organization's plan does not include lesson export. This applies to Solo plan organizations.
```json
{
"error": "Forbidden",
"message": "Lesson export is not available on your current plan. Upgrade to an EdTech plan to export lessons.",
"code": "FEATURE_NOT_AVAILABLE",
"timestamp": "2025-01-20T14:45:00.000Z"
}
```
#### 404 Not Found
The specified lesson or version does not exist, or is not accessible by the authenticated user.
```json
{
"error": "Not Found",
"message": "Published version not found",
"code": "NOT_FOUND",
"timestamp": "2025-01-20T14:45:00.000Z"
}
```
#### 422 Unprocessable Entity
The published version content is invalid or empty.
```json
{
"error": "Invalid Content",
"message": "Published version content is invalid or empty",
"code": "INVALID_CONTENT",
"timestamp": "2025-01-20T14:45:00.000Z"
}
```
#### 500 Internal Server Error
An unexpected error occurred during export.
```json
{
"error": "Internal Server Error",
"message": "An unexpected error occurred while generating export ZIP",
"code": "INTERNAL_ERROR",
"timestamp": "2025-01-20T14:45:00.000Z"
}
```
## Example Requests
### Download Lesson Export
```bash
curl -X GET 'https://app.teacharium.io/api/lessons/550e8400-e29b-41d4-a716-446655440000/versions/6ba7b810-9dad-11d1-80b4-00c04fd430c8/export-zip' \
-H 'Authorization: Bearer tapub_xxxxx.tasec_xxxxx' \
-o lesson-export.zip
```
### Using wget
```bash
wget --header='Authorization: Bearer tapub_xxxxx.tasec_xxxxx' \
'https://app.teacharium.io/api/lessons/550e8400-e29b-41d4-a716-446655440000/versions/6ba7b810-9dad-11d1-80b4-00c04fd430c8/export-zip' \
-O lesson-export.zip
```
## Related Endpoints
### Export Manifest
If you need to download assets individually or implement custom export logic, you can use the manifest endpoint:
```
GET /api/lessons/{lessonId}/versions/{versionId}/export-manifest
```
This returns a JSON manifest with signed URLs for all assets (valid for 4 hours), allowing you to download files individually.
## Notes
- Only published lesson versions can be exported
- The ZIP file includes all media assets and widget bundles required to play the lesson offline
- Media references in `lesson.json` are automatically rewritten to use local paths
- External media (e.g., from Unsplash) is downloaded and included in the ZIP
- Attribution information for external media is preserved in `manifest.json`
- Font files are **not** included. If the lesson uses custom fonts, `manifest.json` has a `fonts` entry (omitted otherwise) with the font families and a ready-made Google Fonts URL; your page must load them. See [Lesson Fonts](https://docs.teacharium.io/api-documentation/self-hosted-embedding/fonts.md)
- Large exports may take several seconds to generate on the server
- The `failedMedia` and `failedWidgets` arrays in the manifest indicate any assets that could not be downloaded
- This endpoint is only available to organizations on an **EdTech** plan. Solo plan organizations should use [hosted embedding](https://docs.teacharium.io/api-documentation/hosted-embedding.md) or [LTI integration](https://docs.teacharium.io/api-documentation.md) instead
---
Source: https://docs.teacharium.io/api-documentation/api/sign-token
# Sign Token
Generate a signed JWT token for embedding lessons on external sites. This token can be used to securely authenticate and authorize access to specific lessons.
## Endpoint
```
POST /api/public/sign-token
```
## Authentication
This endpoint requires authentication using a Bearer token. See [Authentication](https://docs.teacharium.io/api-documentation/api/authentication.md) for complete details on API token format, usage, and error handling.
## Request Body
The request must include a JSON body with the following fields:
| Field | Type | Required | Description |
| ---------------- | ------------- | -------- | ---------------------------------------------------------------------------------------------------------------------------------------------- |
| `lessonId` | string (UUID) | Yes | The lesson ID to include in the token |
| `versionId` | string (UUID) | No | The published version ID to embed. If omitted, the most recently published version is used. Find this in the Embed dialog of the lesson editor |
| `learnerId` | string | Yes | An anonymous identifier for the person taking the lesson. **Do not use PII** like email addresses or full names |
| `userAttributes` | object | No | Optional map of user-supplied attributes to include in the token. **Do not include PII** - use anonymous identifiers only |
| `timeout` | integer | No | Token expiration time in seconds. Defaults to 7200 (2 hours). Maximum: 86400 (24 hours) |
### Example Request Body
```json
{
"lessonId": "550e8400-e29b-41d4-a716-446655440000",
"versionId": "660e8400-e29b-41d4-a716-446655440001",
"learnerId": "learner_abc123",
"userAttributes": {
"userId": "user_12345",
"sessionId": "session_xyz789",
"accountType": "premium"
},
"timeout": 3600
}
```
**Important:** Do not include personally identifiable information (PII) such as email addresses, full names, phone numbers, or addresses in `learnerId` or `userAttributes`. Use anonymous identifiers to protect user privacy and comply with data protection regulations.
## Response
### Success Response (200 OK)
Returns a JSON object with the signed JWT token and its expiration time.
```json
{
"token": "eyJhbGciOiJIUzI1NiIsInR5cCI6IkpXVCJ9...",
"expiresAt": "2025-01-15T12:30:00Z"
}
```
#### Response Fields
| Field | Type | Description |
| ----------- | ----------------- | ------------------------------------------------------------------------------------------------------- |
| `token` | string | Signed JWT token containing the lesson ID, version ID, learner ID, organization ID, and user attributes |
| `expiresAt` | string (ISO 8601) | Timestamp when the token expires |
### JWT Token Claims
The generated JWT contains the following claims:
| Claim | Type | Description |
| ---------------- | ------ | --------------------------------------------------------------------------- |
| `lessonId` | string | The lesson ID provided in the request |
| `versionId` | string | The published version ID provided in the request (omitted if not specified) |
| `learnerId` | string | The learner ID provided in the request |
| `organizationId` | string | The organization ID from your API token |
| `userAttributes` | object | The user attributes provided in the request |
| `iat` | number | Issued at timestamp (Unix timestamp) |
| `exp` | number | Expiration timestamp (Unix timestamp) |
| `iss` | string | Issuer - always "teacharium" |
### Error Responses
#### 401 Unauthorized
Authentication failed. See [Authentication Errors](https://docs.teacharium.io/api-documentation/api/authentication.md#authentication-errors) for detailed information on authentication issues.
#### 404 Not Found
The lesson was not found or does not belong to your organization.
```json
{
"error": "Lesson not found or does not belong to your organization"
}
```
**Possible causes:**
- The lesson ID does not exist
- The lesson belongs to a different organization
- The lesson has been deleted
- The published version ID does not exist for this lesson
#### 422 Unprocessable Entity
The request body is invalid.
```json
{
"error": "Lesson ID must be a UUID"
}
```
**Possible causes:**
- `lessonId` is missing or not a valid UUID
- `versionId` is provided but not a valid UUID
- `timeout` is not a number or exceeds the maximum (86400 seconds / 24 hours)
- Request body is not valid JSON
- Invalid parameter format
#### 500 Internal Server Error
An unexpected error occurred on the server.
```json
{
"error": "Failed to generate token"
}
```
## Example Requests
### Basic Request
Generate a token with default 2-hour expiration:
```bash
curl -X POST 'https://app.teacharium.io/api/public/sign-token' \
-H 'Authorization: Bearer tapub_xxxxx.tasec_xxxxx' \
-H 'Content-Type: application/json' \
-d '{
"lessonId": "550e8400-e29b-41d4-a716-446655440000",
"versionId": "660e8400-e29b-41d4-a716-446655440001",
"learnerId": "learner_abc123"
}'
```
### With User Attributes
Include custom user attributes in the token:
```bash
curl -X POST 'https://app.teacharium.io/api/public/sign-token' \
-H 'Authorization: Bearer tapub_xxxxx.tasec_xxxxx' \
-H 'Content-Type: application/json' \
-d '{
"lessonId": "550e8400-e29b-41d4-a716-446655440000",
"versionId": "660e8400-e29b-41d4-a716-446655440001",
"learnerId": "learner_abc123",
"userAttributes": {
"userId": "user_12345",
"sessionId": "session_xyz789",
"accountType": "premium"
}
}'
```
### With Custom Timeout
Generate a token that expires in 1 hour (3600 seconds):
```bash
curl -X POST 'https://app.teacharium.io/api/public/sign-token' \
-H 'Authorization: Bearer tapub_xxxxx.tasec_xxxxx' \
-H 'Content-Type: application/json' \
-d '{
"lessonId": "550e8400-e29b-41d4-a716-446655440000",
"versionId": "660e8400-e29b-41d4-a716-446655440001",
"learnerId": "learner_abc123",
"userAttributes": {
"userId": "user_12345"
},
"timeout": 3600
}'
```
### JavaScript/TypeScript Example
```javascript
async function signLessonToken(
lessonId,
versionId,
learnerId,
userAttributes = {},
timeout = 7200,
) {
const response = await fetch(
"https://app.teacharium.io/api/public/sign-token",
{
method: "POST",
headers: {
Authorization: `Bearer ${publicKey}.${secretKey}`,
"Content-Type": "application/json",
},
body: JSON.stringify({
lessonId,
versionId,
learnerId,
userAttributes,
timeout,
}),
},
);
if (!response.ok) {
const error = await response.json();
throw new Error(error.error);
}
return await response.json();
}
// Usage
const { token, expiresAt } = await signLessonToken(
"550e8400-e29b-41d4-a716-446655440000",
"660e8400-e29b-41d4-a716-446655440001",
"learner_abc123",
{ userId: "user_12345", accountType: "premium" },
3600,
);
```
### Python Example
```python
import requests
import json
def sign_lesson_token(lesson_id, version_id, learner_id, user_attributes=None, timeout=7200):
headers = {
'Authorization': f'Bearer {public_key}.{secret_key}',
'Content-Type': 'application/json'
}
body = {
'lessonId': lesson_id,
'versionId': version_id,
'learnerId': learner_id,
'timeout': timeout
}
if user_attributes:
body['userAttributes'] = user_attributes
response = requests.post(
'https://app.teacharium.io/api/public/sign-token',
headers=headers,
json=body
)
response.raise_for_status()
return response.json()
# Usage
result = sign_lesson_token(
'550e8400-e29b-41d4-a716-446655440000',
'660e8400-e29b-41d4-a716-446655440001',
'learner_abc123',
user_attributes={'userId': 'user_12345', 'accountType': 'premium'},
timeout=3600
)
token = result['token']
expires_at = result['expiresAt']
```
## Security Considerations
- **Lesson and version ownership**: Only lessons and published versions belonging to your organization can be signed
- **Version pinning**: When `versionId` is provided, tokens are tied to a specific published version, ensuring learners see the exact content you intended. When omitted, the latest published version is served each time the lesson loads
- **Token expiration**: Tokens automatically expire after the specified timeout
- **User attributes**: User attributes are embedded in the token and cannot be modified without re-signing
- **Token verification**: The generated token should be verified before granting access to lessons
- **Transport security**: Always use HTTPS when transmitting tokens
## Use Cases
This endpoint is designed for scenarios where you want to:
1. **Embed lessons on external websites**: Generate tokens for users visiting your site
2. **Single Sign-On (SSO)**: Create tokens that include user identity information
3. **Temporary access**: Provide time-limited access to lessons
4. **User tracking**: Include user attributes for analytics or personalization
5. **Multi-tenant applications**: Include tenant/organization information in the token
## Notes
- Only lessons with published versions belonging to your organization can be signed
- If a `versionId` is specified, the version must exist for the given lesson
- If `versionId` is omitted, the most recently published version is used when the lesson loads
- Deleted lessons cannot be signed
- Tokens include the organization ID to ensure proper multi-tenant isolation
- The JWT signing secret must be configured in your environment via the `JWT_SECRET` variable
- User attributes can contain any JSON-serializable data
- The maximum timeout is 24 hours (86400 seconds)
- The default timeout is 2 hours (7200 seconds)
---
Source: https://docs.teacharium.io/api-documentation/api/embed-player-data
# Embed Player Data
Retrieve lesson data for embedded players using JWT token authentication. This endpoint is designed for displaying lessons in embedded iframes on external websites.
For a complete guide on embedding lessons, see [Embedding Lessons (Hosted)](https://docs.teacharium.io/api-documentation/hosted-embedding.md).
## Endpoint
```
GET /api/public/lessons/{lessonId}/player-data
```
## Authentication
This endpoint requires JWT token authentication. The token must be obtained from the [Sign Token](https://docs.teacharium.io/api-documentation/api/sign-token.md) endpoint and passed as a query parameter.
Unlike other API endpoints that use Bearer token authentication, this endpoint uses a JWT token in the query string for compatibility with iframe embedding.
## URL Parameters
| Parameter | Type | Required | Description |
| ---------- | ------------- | -------- | ------------------------- |
| `lessonId` | string (UUID) | Yes | The lesson ID to retrieve |
## Query Parameters
| Parameter | Type | Required | Default | Description |
| ---------------------- | ------- | -------- | ------- | --------------------------------------- |
| `token` | string | Yes | | JWT token from `/api/public/sign-token` |
| `include_metadata` | boolean | No | `false` | Include lesson metadata in response |
| `validate_playability` | boolean | No | `true` | Validate lesson is playable |
## Request Example
```bash
curl 'https://app.teacharium.io/api/public/lessons/550e8400-e29b-41d4-a716-446655440000/player-data?token=eyJhbGciOiJIUzI1NiIsInR5cCI6IkpXVCJ9...&include_metadata=true'
```
## Response
### Success Response (200 OK)
Returns the lesson data optimized for the TeachariumPlayer, along with user attributes from the token.
```json
{
"lesson": {
"lesson": {
"id": "550e8400-e29b-41d4-a716-446655440000",
"title": "Introduction to JavaScript",
"status": "published",
"variable_definitions": [
{
"name": "userName",
"type": "string",
"initialValue": "Student"
}
],
"widget_settings": {
"overrides": {}
}
},
"sections": [
{
"id": "section-1",
"title": "Getting Started",
"order_index": 0,
"steps": [
{
"id": "step-1",
"title": "Welcome",
"order_index": 0,
"content": {
"content": [],
"root": {}
}
}
]
}
],
"totalSteps": 10,
"totalSections": 3
},
"userAttributes": {
"userId": "user_12345",
"sessionId": "session_abc",
"accountType": "premium"
},
"metadata": {
"title": "Introduction to JavaScript",
"status": "published",
"totalSections": 3,
"totalSteps": 10,
"estimatedDuration": 600
},
"playability": {
"valid": true,
"errors": []
}
}
```
#### Response Fields
| Field | Type | Description |
| ---------------------- | ------ | --------------------------------------------------------------- |
| `lesson` | object | Complete lesson data formatted for the player |
| `lesson.lesson` | object | Lesson metadata and settings |
| `lesson.sections` | array | Array of sections with steps |
| `lesson.totalSteps` | number | Total number of steps across all sections |
| `lesson.totalSections` | number | Total number of sections |
| `userAttributes` | object | User attributes from the JWT token |
| `metadata` | object | Additional lesson metadata (if `include_metadata=true`) |
| `playability` | object | Playability validation results (if `validate_playability=true`) |
### Error Responses
#### 400 Bad Request
Invalid request parameters.
```json
{
"error": "Invalid lesson ID"
}
```
**Possible causes:**
- Missing or invalid lesson ID
- Missing token parameter
- Invalid query parameters
#### 401 Unauthorized
Token authentication failed.
```json
{
"error": "Token verification failed: Token expired"
}
```
**Possible causes:**
- Token has expired
- Token signature is invalid
- Token was not signed with the correct secret
- Missing `JWT_SECRET` environment variable
#### 403 Forbidden
Token does not grant access to the requested lesson.
```json
{
"error": "Token does not grant access to this lesson"
}
```
**Possible causes:**
- The lesson ID in the URL doesn't match the lesson ID in the token
- Attempting to use a token for a different lesson
#### 404 Not Found
Lesson not found or doesn't belong to the organization.
```json
{
"error": "Lesson not found or access denied"
}
```
**Possible causes:**
- Lesson ID doesn't exist
- Lesson belongs to a different organization than the one in the token
- Lesson has been deleted
#### 422 Unprocessable Entity
Lesson has validation errors that prevent playback (only if `validate_playability=true`).
```json
{
"error": "Lesson has validation errors that prevent playback"
}
```
**Possible causes:**
- Lesson has no sections
- Lesson has sections with no steps
- Lesson structure is incomplete
#### 500 Internal Server Error
An unexpected error occurred.
```json
{
"error": "An unexpected error occurred while fetching lesson data"
}
```
## Usage Example
### JavaScript/TypeScript
```javascript
async function loadEmbeddedLesson(lessonId, token) {
const url = new URL(
`/api/public/lessons/${lessonId}/player-data`,
"https://app.teacharium.io",
);
url.searchParams.set("token", token);
url.searchParams.set("include_metadata", "true");
url.searchParams.set("validate_playability", "true");
const response = await fetch(url.toString());
if (!response.ok) {
const error = await response.json();
throw new Error(error.error);
}
return await response.json();
}
// Usage
try {
const lessonData = await loadEmbeddedLesson(
"550e8400-e29b-41d4-a716-446655440000",
"eyJhbGciOiJIUzI1NiIsInR5cCI6IkpXVCJ9...",
);
console.log("Lesson loaded:", lessonData.lesson.lesson.title);
console.log("User ID:", lessonData.userAttributes.userId);
console.log("Total steps:", lessonData.lesson.totalSteps);
} catch (error) {
console.error("Failed to load lesson:", error.message);
}
```
### React Hook
```javascript
import { useState, useEffect } from "react";
function useEmbeddedLesson(lessonId, token) {
const [data, setData] = useState(null);
const [loading, setLoading] = useState(true);
const [error, setError] = useState(null);
useEffect(() => {
if (!lessonId || !token) {
setError("Missing lesson ID or token");
setLoading(false);
return;
}
async function fetchLesson() {
try {
const url = new URL(
`/api/public/lessons/${lessonId}/player-data`,
"https://app.teacharium.io",
);
url.searchParams.set("token", token);
url.searchParams.set("include_metadata", "true");
const response = await fetch(url.toString());
if (!response.ok) {
const error = await response.json();
throw new Error(error.error);
}
const result = await response.json();
setData(result);
} catch (err) {
setError(err.message);
} finally {
setLoading(false);
}
}
fetchLesson();
}, [lessonId, token]);
return { data, loading, error };
}
// Usage in component
function EmbeddedLessonPlayer({ lessonId, token }) {
const { data, loading, error } = useEmbeddedLesson(lessonId, token);
if (loading) return
Loading...
;
if (error) return
Error: {error}
;
if (!data) return null;
return (
{data.lesson.lesson.title}
);
}
```
## CORS Support
This endpoint includes CORS headers to allow embedding from any origin:
```
Access-Control-Allow-Origin: *
Access-Control-Allow-Methods: GET, OPTIONS
Access-Control-Allow-Headers: Content-Type
```
## Security Considerations
- **Token expiration**: Tokens expire based on the timeout set when signing (default 2 hours, max 24 hours)
- **Lesson access control**: Tokens are tied to specific lessons and cannot be used for other lessons
- **Organization isolation**: Lessons can only be accessed if they belong to the organization that signed the token
- **User attributes**: User attributes in the token are read-only and cannot be modified without re-signing
- **Service role access**: This endpoint uses service role access to bypass RLS, as authentication is handled via JWT
## Related Endpoints
- [Sign Token](https://docs.teacharium.io/api-documentation/api/sign-token.md) - Generate JWT tokens for embedding
- [List Lessons](https://docs.teacharium.io/api-documentation/api/list-lessons.md) - List available lessons for your organization
## Differences from Authenticated Player Data
This endpoint differs from `/api/lessons/{id}/player-data` in several ways:
| Feature | Public Embed Endpoint | Authenticated Endpoint |
| -------------- | ------------------------- | ----------------------- |
| Authentication | JWT token in query string | Session-based (cookies) |
| Access Control | Token-based | RLS + user session |
| CORS | Enabled for all origins | Restricted |
| User Context | From token attributes | From authenticated user |
| Use Case | External embedding | Internal application |
## Best Practices
1. **Generate tokens server-side**: Never expose API credentials in client code
2. **Set appropriate timeouts**: Match token expiration to expected lesson duration
3. **Include user identification**: Use `userAttributes` in tokens for tracking
4. **Handle token expiration**: Implement token refresh logic if needed
5. **Validate responses**: Always check response status and handle errors gracefully
6. **Cache conservatively**: Response includes `Cache-Control: no-store` header
## Next Steps
- [Learn how to embed lessons](https://docs.teacharium.io/api-documentation/hosted-embedding.md)
- [Understand authentication](https://docs.teacharium.io/api-documentation/api/authentication.md)
- [Sign tokens for embedding](https://docs.teacharium.io/api-documentation/api/sign-token.md)
---
Source: https://docs.teacharium.io/api-documentation/api/get-learner-progress
# Get Learner Progress
Retrieve a learner's progress and scores for a specific lesson. Two endpoints are available depending on your integration type: **Embed** (for embedded lessons) and **LTI** (for LTI-launched lessons).
> \[!NOTE]
> **Hosted embedding only**
>
> These endpoints return progress data that Teacharium records when lessons are served through Teacharium's hosted infrastructure (hosted embedding or LTI). If you export a lesson and embed it in your own application using the [self-hosted player](https://docs.teacharium.io/api-documentation/self-hosted-embedding.md), you are responsible for recording and storing learner progress yourself using the `onStepChange` and `onComplete` callbacks.
## Endpoints
```
GET /api/public/lessons/:lessonId/progress/:learnerId
GET /api/public/lessons/:lessonId/lti-progress/:ltiUserId?platformId=...&contextId=...
```
## Authentication
Both endpoints require authentication using a Bearer token. See [Authentication](https://docs.teacharium.io/api-documentation/api/authentication.md) for complete details on API token format, usage, and error handling.
---
## Embed Progress
Retrieve progress for a learner identified by the `learnerId` used when generating the embed token.
### Endpoint
```
GET /api/public/lessons/:lessonId/progress/:learnerId
```
### Path Parameters
| Parameter | Type | Required | Description |
| ----------- | ------------- | -------- | -------------------------------------- |
| `lessonId` | string (UUID) | Yes | The lesson's unique identifier |
| `learnerId` | string | Yes | The learner ID used in the embed token |
### Response
#### Success Response (200 OK)
```json
{
"lessonId": "550e8400-e29b-41d4-a716-446655440000",
"learnerId": "user-123",
"status": "completed",
"score": 3,
"maxScore": 3,
"currentSectionIndex": 0,
"currentStepIndex": 3,
"totalSteps": 4,
"progressData": {},
"variableState": {},
"items": [],
"userAttributes": {},
"startedAt": "2025-06-01T10:00:00Z",
"completedAt": "2025-06-01T10:15:00Z",
"lastActivityAt": "2025-06-01T10:15:00Z"
}
```
#### Response Fields
| Field | Type | Description |
| --------------------- | -------------- | ------------------------------------------------------------------- |
| `lessonId` | string (UUID) | Lesson identifier |
| `learnerId` | string | Learner identifier |
| `status` | string | Progress status: `"not_started"`, `"in_progress"`, or `"completed"` |
| `score` | number \| null | Current score |
| `maxScore` | number \| null | Maximum possible score |
| `currentSectionIndex` | number | Zero-based index of the current section |
| `currentStepIndex` | number | Zero-based index of the current step within the section |
| `totalSteps` | number \| null | Total number of steps in the lesson |
| `progressData` | object \| null | Full session state for resume (JSONB) |
| `variableState` | object \| null | Current variable values (JSONB) |
| `items` | array \| null | Per-widget scored results (JSONB) |
| `userAttributes` | object \| null | User attributes from the embed token context (JSONB) |
| `startedAt` | string \| null | ISO 8601 timestamp when the learner started |
| `completedAt` | string \| null | ISO 8601 timestamp when the learner completed |
| `lastActivityAt` | string | ISO 8601 timestamp of the most recent activity |
### Example Request
```bash
curl -X GET 'https://app.teacharium.io/api/public/lessons/550e8400-e29b-41d4-a716-446655440000/progress/user-123' \
-H 'Authorization: Bearer tapub_xxxxx.tasec_xxxxx'
```
---
## LTI Progress
Retrieve progress for an LTI user identified by their LTI user ID and platform.
### Endpoint
```
GET /api/public/lessons/:lessonId/lti-progress/:ltiUserId
```
### Path Parameters
| Parameter | Type | Required | Description |
| ----------- | ------------- | -------- | ---------------------------------- |
| `lessonId` | string (UUID) | Yes | The lesson's unique identifier |
| `ltiUserId` | string | Yes | The LTI user ID from the LTI token |
### Query Parameters
| Parameter | Type | Required | Description |
| ------------ | ------ | -------- | ----------------------------------------------------------------- |
| `platformId` | string | Yes | The LTI platform ID (ltijs platform identifier) |
| `contextId` | string | No | The LTI context (course) ID. Optional; omit to match any context. |
### Response
#### Success Response (200 OK)
```json
{
"lessonId": "550e8400-e29b-41d4-a716-446655440000",
"ltiUserId": "lti-user-456",
"platformId": "platform-789",
"contextId": "course-101",
"courseId": "6ba7b810-9dad-11d1-80b4-00c04fd430c8",
"status": "completed",
"score": 85.0,
"maxScore": 100.0,
"currentSectionIndex": 0,
"currentStepIndex": 3,
"progressData": {},
"variableState": {},
"startedAt": "2025-06-01T10:00:00Z",
"completedAt": "2025-06-01T10:15:00Z",
"lastActivityAt": "2025-06-01T10:15:00Z"
}
```
#### Response Fields
| Field | Type | Description |
| --------------------- | -------------- | ------------------------------------------------------------------- |
| `lessonId` | string (UUID) | Lesson identifier |
| `ltiUserId` | string | LTI user identifier |
| `platformId` | string | LTI platform identifier |
| `contextId` | string \| null | LTI context (course) identifier |
| `courseId` | string (UUID) | Internal course identifier |
| `status` | string | Progress status: `"not_started"`, `"in_progress"`, or `"completed"` |
| `score` | number \| null | Current score (0-100) |
| `maxScore` | number \| null | Maximum possible score (0-100) |
| `currentSectionIndex` | number | Zero-based index of the current section |
| `currentStepIndex` | number | Zero-based index of the current step within the section |
| `progressData` | object \| null | Full session state for resume (JSONB) |
| `variableState` | object \| null | Current variable values (JSONB) |
| `startedAt` | string \| null | ISO 8601 timestamp when the learner started |
| `completedAt` | string \| null | ISO 8601 timestamp when the learner completed |
| `lastActivityAt` | string | ISO 8601 timestamp of the most recent activity |
### Example Requests
#### With Context ID
```bash
curl -X GET 'https://app.teacharium.io/api/public/lessons/550e8400.../lti-progress/lti-user-456?platformId=platform-789&contextId=course-101' \
-H 'Authorization: Bearer tapub_xxxxx.tasec_xxxxx'
```
#### Without Context ID
```bash
curl -X GET 'https://app.teacharium.io/api/public/lessons/550e8400.../lti-progress/lti-user-456?platformId=platform-789' \
-H 'Authorization: Bearer tapub_xxxxx.tasec_xxxxx'
```
---
## Error Responses
Both endpoints share the same error response format.
### 401 Unauthorized
Authentication failed. See [Authentication Errors](https://docs.teacharium.io/api-documentation/api/authentication.md#authentication-errors) for detailed information.
### 404 Not Found
The lesson, platform, or progress record was not found.
```json
{
"error": "No progress found for this learner and lesson"
}
```
**Possible causes:**
- The lesson ID does not exist or does not belong to your organization
- The learner/LTI user has not started the lesson yet
- (LTI only) The platform ID does not belong to your organization
### 422 Unprocessable Entity
The request parameters are invalid.
```json
{
"error": "Invalid lesson ID format"
}
```
### 500 Internal Server Error
An unexpected error occurred on the server.
```json
{
"error": "Failed to fetch progress data"
}
```
## Notes
- Only progress for lessons belonging to your organization can be retrieved
- JSONB fields (`progressData`, `variableState`, `items`, `userAttributes`) are returned as-is and will be `null` when not set
- The `status` field can be `"not_started"`, `"in_progress"`, or `"completed"`
- For the LTI endpoint, omitting `contextId` returns the first matching record regardless of context
- The embed endpoint's `items` field contains per-widget scored results, useful for detailed analytics
---
Source: https://docs.teacharium.io/api-documentation/hosted-embedding
# Hosted Embedding
Learn how to embed Teacharium lessons on your website or application using secure iframe-based embedding with JWT authentication.
## Overview
Teacharium provides a complete solution for embedding interactive lessons on external websites. The embedding system uses:
- **JWT tokens** for secure, time-limited access
- **Iframe embedding** for isolated, secure content delivery
- **JavaScript SDK** for easy integration
- **PostMessage API** for communication between the embedded lesson and parent page
The embedded player runs on Teacharium's servers, so lesson settings such as [lesson fonts](https://docs.teacharium.io/docs/build-your-lesson/lesson-fonts.md) (loaded from Google Fonts) and custom CSS work without any setup on your page.
## Prerequisites
Before you begin, you'll need:
1. A Teacharium account with at least one published lesson version
2. Public API credentials (public key and secret key)
3. The **Lesson ID** of a published lesson (find this by clicking **Embed** on a version in the Lesson Delivery tab). Optionally, a **Version ID** to pin to a specific published version
4. A website or application where you want to embed lessons
## Quick Start
### Step 1: Install the SDK
Install the Teacharium Embed SDK in your project:
```bash
npm install @teacharium/embed-sdk
```
Or include it directly via CDN:
```html
```
### Step 2: Generate a Token
On your backend server, generate a signed JWT token for the lesson. Include a `lessonId` and optionally a `versionId` to pin to a specific published version. If `versionId` is omitted, the most recently published version is used:
```javascript
const response = await fetch(
"https://app.teacharium.io/api/public/sign-token",
{
method: "POST",
headers: {
Authorization: `Bearer ${publicKey}.${secretKey}`,
"Content-Type": "application/json",
},
body: JSON.stringify({
lessonId: "your-lesson-id",
versionId: "your-published-version-id", // Optional: omit to always use the latest version
learnerId: "learner_abc123", // Required: anonymous identifier for the learner
userAttributes: {
userId: "user_67890",
sessionId: "session_abc123",
accountType: "premium",
},
timeout: 7200, // 2 hours
}),
},
);
const { token, expiresAt } = await response.json();
```
**Important Security Notes:**
- Always generate tokens on your backend server. Never expose your API secret key in client-side code.
- **Do not include PII (Personally Identifiable Information)** such as email addresses, full names, phone numbers, or addresses in `userAttributes`. Use anonymous identifiers like user IDs or session IDs instead. This protects user privacy and complies with data protection regulations.
### Step 3: Embed the Lesson
Add a container element to your HTML:
```html
```
Then embed the lesson using the SDK:
```javascript
import { embedLesson } from "@teacharium/embed-sdk";
const embed = embedLesson({
container: "#lesson-container",
token: token, // Token from Step 2
// baseUrl defaults to https://app.teacharium.io
// lessonId and versionId are automatically extracted from the token
width: "100%",
height: "600px",
onLoad: () => console.log("Lesson loaded"),
onComplete: (data) => console.log("Lesson completed", data),
onProgress: (data) => console.log("Progress update", data),
onError: (error) => console.error("Error", error),
onEvent: (type, payload) => console.log("Event", type, payload),
});
```
**Note:** The SDK automatically uses `https://app.teacharium.io` as the base URL and extracts the `lessonId` and `versionId` from the token, so you typically don't need to specify these values unless you're using a self-hosted instance.
## Token Generation
Tokens are generated using the `/api/public/sign-token` endpoint. See the [Sign Token API documentation](https://docs.teacharium.io/api-documentation/api/sign-token.md) for complete details.
**Key points:**
- Tokens are tied to a specific lesson and organization
- When `versionId` is included, the token is pinned to that exact version, ensuring learners see the exact content you intended
- When `versionId` is omitted, the most recently published version is served each time the lesson loads
- Default expiration is 2 hours (configurable up to 24 hours)
- User attributes are embedded in the token for tracking and personalization
- Tokens cannot be modified without re-signing
---
Source: https://docs.teacharium.io/api-documentation/hosted-embedding/sdk-reference
# SDK Reference
## SDK Options
The `embedLesson()` function accepts the following options:
| Option | Type | Required | Description |
| ------------ | ----------------------- | -------- | -------------------------------------------------------------------------------------------------------- |
| `container` | `HTMLElement \| string` | Yes | Container element or CSS selector |
| `token` | `string` | Yes | JWT token from sign-token endpoint (lessonId and versionId are automatically extracted) |
| `baseUrl` | `string` | No | Base URL of your Teacharium instance (default: "[https://app.teacharium.io](https://app.teacharium.io)") |
| `width` | `string` | No | Iframe width (default: "100%") |
| `height` | `string` | No | Iframe height (default: "600px") |
| `className` | `string` | No | Additional CSS classes for iframe |
| `autoStart` | `boolean` | No | Skip the start button and begin the lesson immediately (default: `false`) |
| `resume` | `boolean` | No | Resume from where the learner left off (default: `true`). Set to `false` to always start fresh |
| `onLoad` | `function` | No | Callback when lesson iframe loads |
| `onComplete` | `function` | No | Callback when lesson completes |
| `onProgress` | `function` | No | Callback for progress updates |
| `onError` | `function` | No | Callback for errors |
| `onEvent` | `function` | No | Callback for all lesson events (recommended) |
## Event Handling
### onEvent (Recommended)
The `onEvent` callback receives every event from the lesson's internal event system. This is the most flexible way to track lesson activity:
```javascript
onEvent: (type, payload) => {
console.log(`Event: ${type}`, payload);
// Handle specific events
if (type === "lesson_completed") {
trackCompletion(payload);
}
};
```
Common event types include:
| Event Type | Description |
| ------------------ | ----------------------------- |
| `play` | User clicked the start button |
| `lesson_started` | Lesson playback began |
| `section_started` | Entered a new section |
| `step_started` | Entered a new step |
| `lesson_completed` | User completed the lesson |
| `variable_changed` | A lesson variable was updated |
All events include a `type` field and a `timestamp` (ISO string).
### Convenience Callbacks
The SDK also provides specific callbacks for common events:
#### onLoad
Fired when the lesson iframe has finished loading:
```javascript
onLoad: () => {
console.log("Lesson is ready to play");
// Hide loading indicator, etc.
};
```
#### onComplete
Fired when the user completes the entire lesson:
```javascript
onComplete: (data) => {
console.log("Lesson completed!");
console.log("Lesson ID:", data.lessonId);
console.log("Completed at:", data.completedAt);
console.log("Total steps:", data.totalSteps);
// Track completion in your system
trackCompletion(data);
};
```
#### onProgress
Fired when the user progresses through the lesson:
```javascript
onProgress: (data) => {
const percent = (data.currentStep / data.totalSteps) * 100;
console.log(`Progress: ${percent.toFixed(1)}%`);
// Update progress bar
updateProgressBar(percent);
};
```
#### onError
Fired when an error occurs:
```javascript
onError: (error) => {
console.error("Lesson error:", error.message);
// Show error message to user
showErrorNotification(error.message);
};
```
## API Reference
For detailed API documentation, see:
- [Sign Token API](https://docs.teacharium.io/api-documentation/api/sign-token.md) - Generate JWT tokens for embedding
- [List Lessons API](https://docs.teacharium.io/api-documentation/api/list-lessons.md) - List available lessons
---
Source: https://docs.teacharium.io/api-documentation/hosted-embedding/examples
# Examples
## React Integration
```jsx
import { useEffect, useRef } from "react";
import { embedLesson } from "@teacharium/embed-sdk";
function LessonEmbed({ token, onComplete }) {
const containerRef = useRef(null);
const embedRef = useRef(null);
useEffect(() => {
if (containerRef.current && token) {
embedRef.current = embedLesson({
container: containerRef.current,
token: token,
// baseUrl, lessonId, and versionId are handled automatically
onComplete: (data) => {
console.log("Lesson completed!", data);
onComplete?.(data);
},
onProgress: (data) => {
console.log(`Progress: ${data.currentStep}/${data.totalSteps}`);
},
});
}
// Cleanup on unmount
return () => {
if (embedRef.current) {
embedRef.current.destroy();
}
};
}, [token, onComplete]);
return ;
}
export default LessonEmbed;
```
## Vue.js Integration
```vue
```
## Responsive Embedding
Create a responsive embed that adjusts to different screen sizes:
```javascript
embedLesson({
container: "#lesson",
token: token,
width: "100%",
height: "80vh", // 80% of viewport height
className: "responsive-lesson-iframe",
});
```
```css
.responsive-lesson-iframe {
max-width: 1200px;
margin: 0 auto;
border-radius: 8px;
box-shadow: 0 4px 6px rgba(0, 0, 0, 0.1);
}
@media (max-width: 768px) {
.responsive-lesson-iframe {
height: 100vh !important;
border-radius: 0;
}
}
```
## Progress Tracking
Implement a visual progress bar that updates as the user progresses:
```html
0%
```
```javascript
embedLesson({
container: "#lesson-container",
token: token,
onProgress: (data) => {
const percent = (data.currentStep / data.totalSteps) * 100;
document.getElementById("progress-bar").style.width = `${percent}%`;
document.getElementById("progress-text").textContent = `${Math.round(
percent,
)}%`;
},
onComplete: (data) => {
// Redirect to success page or show completion message
window.location.href = "/lesson-complete";
},
});
```
```css
.progress-container {
width: 100%;
height: 30px;
background: #e0e0e0;
border-radius: 4px;
position: relative;
margin-bottom: 20px;
}
.progress-bar {
height: 100%;
background: linear-gradient(90deg, #4caf50, #8bc34a);
border-radius: 4px;
transition: width 0.3s ease;
width: 0%;
}
.progress-text {
position: absolute;
top: 50%;
left: 50%;
transform: translate(-50%, -50%);
font-weight: bold;
color: #333;
}
```
## Server-Side Token Generation (Node.js/Express)
Example backend endpoint for generating tokens:
```javascript
const express = require("express");
const app = express();
app.post("/api/embed-token", async (req, res) => {
const { lessonId, versionId, learnerId, userId, sessionId } = req.body;
try {
const response = await fetch(
"https://app.teacharium.io/api/public/sign-token",
{
method: "POST",
headers: {
Authorization: `Bearer ${process.env.TEACHARIUM_PUBLIC_KEY}.${process.env.TEACHARIUM_SECRET_KEY}`,
"Content-Type": "application/json",
},
body: JSON.stringify({
lessonId: lessonId,
...(versionId ? { versionId } : {}), // Optional: omit to use latest version
learnerId: learnerId, // Required: anonymous identifier for the learner
userAttributes: {
userId: userId,
sessionId: sessionId,
timestamp: new Date().toISOString(),
},
timeout: 7200,
}),
},
);
if (!response.ok) {
throw new Error("Failed to generate token");
}
const { token, expiresAt } = await response.json();
res.json({ token, expiresAt });
} catch (error) {
console.error("Error generating token:", error);
res.status(500).json({ error: "Failed to generate embed token" });
}
});
```
**Important:** Do not pass PII such as email addresses in `userAttributes`. Use anonymous identifiers like user IDs or session IDs instead.
---
Source: https://docs.teacharium.io/api-documentation/hosted-embedding/security
# Security & Troubleshooting
## Security Best Practices
1. **Never expose API keys in client-side code**
- Always generate tokens on your backend server
- Store API credentials in environment variables
2. **Do not include PII in tokens**
- **Never** include personally identifiable information such as email addresses, full names, phone numbers, or addresses in `userAttributes`
- Use anonymous identifiers like user IDs, session IDs, or account numbers
- This protects user privacy and helps comply with data protection regulations (GDPR, CCPA, etc.)
- Embedded tokens may be visible in browser URLs or logs
3. **Use appropriate token expiration times**
- Set `timeout` based on expected lesson duration
- Default 2 hours is suitable for most lessons
- Maximum 24 hours for longer courses
4. **Include user identification in tokens**
- Use `userAttributes` to track which user is taking the lesson
- Include anonymous identifiers like user IDs or session IDs
- This data is securely embedded in the token
5. **Validate token ownership**
- The API automatically validates that tokens match the requested lesson
- Tokens cannot be reused for different lessons
6. **Use HTTPS**
- Always serve your embedding page over HTTPS
- Teacharium requires HTTPS for API requests
## Troubleshooting
### Token Invalid or Expired
**Error:** "Token verification failed: Token expired"
**Solution:** Generate a new token. Tokens expire after the specified timeout period.
### Lesson Not Found
**Error:** "Lesson not found or access denied"
**Causes:**
- The lesson ID is incorrect
- The lesson hasn't been published
- The lesson belongs to a different organization
**Solution:** Verify the lesson ID and ensure the lesson is published.
### CORS Errors
**Error:** "Cross-origin request blocked"
**Solution:** The embed player page includes proper CORS headers. Ensure you're using the correct base URL and the lesson ID matches the token.
### Iframe Not Loading
**Causes:**
- Content Security Policy (CSP) restrictions on your page
- X-Frame-Options preventing embedding
**Solution:** Ensure your page allows iframe embedding:
```html
```
---
Source: https://docs.teacharium.io/api-documentation/self-hosted-embedding
# Self-Hosted Embedding
The `TeachariumPlayer` is a self-contained React component for embedding Teacharium lessons in your application. It handles all provider setup internally, making integration straightforward.
## Installation
```bash
npm install @teacharium/player @teacharium/widget @measured/puck
# or
pnpm add @teacharium/player @teacharium/widget @measured/puck
```
## Quick Start
```tsx
import { TeachariumPlayer } from "@teacharium/player";
import { getWidgets } from "@teacharium/widget";
import lessonData from "./lesson.json";
function LessonPage() {
return (
console.log("Lesson completed", result)}
/>
);
}
```
---
Source: https://docs.teacharium.io/api-documentation/self-hosted-embedding/props-reference
# Props Reference
## Required Props
| Prop | Type | Description |
| -------- | ------------------------ | -------------------------------- |
| `lesson` | `TeachariumLessonExport` | The lesson data in export format |
You must provide either `widgets` or `puckConfig`:
| Prop | Type | Description |
| ------------ | -------------------- | -------------------------------------------- |
| `widgets` | `TeachariumWidget[]` | List of widgets (recommended for most cases) |
| `puckConfig` | `Config` | Pre-built Puck config for advanced use cases |
## Optional Props
| Prop | Type | Default | Description |
| ---------------------- | ------------------------------------ | ----------- | ------------------------------------------------ |
| `config` | `Partial` | `{}` | Player configuration options |
| `mode` | `"player" \| "review"` | `"player"` | Playback mode (review disables interactions) |
| `initialSessionState` | `SessionState` | `undefined` | Resume from saved session state |
| `mediaResolvers` | `MediaResolverConfig` | No-op | Hooks for resolving media URLs |
| `onStepChange` | `(state: SessionState) => void` | `undefined` | Called at step boundaries for auto-saving |
| `onComplete` | `(result: CompletionResult) => void` | `undefined` | Called when lesson completes |
| `additionalComponents` | `Record` | `undefined` | Extra Puck components (when using `widgets`) |
| `className` | `string` | `undefined` | CSS class for container |
| `showStartButton` | `boolean` | `true` | Show start button overlay |
| `startButtonText` | `string` | `"Start"` | Custom start button text |
| `headerContent` | `React.ReactNode` | `undefined` | Content above the player |
| `sideContent` | `React.ReactNode` | `undefined` | Content alongside the player (e.g., debug panel) |
---
Source: https://docs.teacharium.io/api-documentation/self-hosted-embedding/session-state
# Session State & Types
## Session State
The player uses `SessionState` to track the learner's progress through a lesson. This includes:
- Current position in the lesson
- History of visited steps with variable snapshots
- Widget states for each step (for resume/review)
### SessionState Structure
```typescript
interface SessionState {
version: 1;
lessonId: string;
currentHistoryIndex: number;
stepHistory: StepVisit[];
progress: LessonProgress;
currentVariables: Record;
createdAt: string;
updatedAt: string;
}
interface StepVisit {
visitId: string;
stepId: string;
sectionIndex: number;
stepIndex: number;
variableSnapshot: Record;
widgetStates: Record;
itemStates: ItemState[];
visitedAt: string;
}
```
## CompletionResult
Sent via `onComplete` when the lesson finishes:
```typescript
interface CompletionResult {
/** Final variable values at lesson completion */
finalVariables: Record;
/** Final progress state */
progress: LessonProgress;
/** Total score achieved (if items had scores) */
score?: number;
/** Maximum possible score */
maxScore?: number;
/** All items from the lesson */
items?: ItemData[];
/** Full session state for review mode */
sessionState: SessionState;
}
```
## TypeScript Types
Import types from the package:
```typescript
import type {
TeachariumPlayerProps,
TeachariumLessonExport,
SessionState,
CompletionResult,
LessonProgress,
PlayerConfig,
MediaResolverConfig,
} from "@teacharium/player";
```
---
Source: https://docs.teacharium.io/api-documentation/self-hosted-embedding/configuration
# Configuration & Modes
## Player Configuration
The `config` prop accepts these options:
```typescript
interface PlayerConfig {
showProgress?: boolean; // Show progress footer (default: true)
allowPreviousStep?: boolean; // Allow going back
allowSkipping?: boolean; // Allow skipping steps
autoAdvance?: boolean; // Auto-advance between steps
defaultStepDuration?: number; // Default step duration (ms)
showTimer?: boolean; // Show timer UI
debugMode?: boolean; // Enable debug logging
fontLoading?: "none" | "google"; // Load the lesson's fonts from Google Fonts (default: "none")
}
```
### Font loading
Lessons can use custom [Google Fonts](https://docs.teacharium.io/api-documentation/self-hosted-embedding/fonts.md). The player always applies them. With the default `fontLoading: "none"`, your page loads the font files. Set `fontLoading: "google"` to have the player load them from Google Fonts. See [Lesson Fonts](https://docs.teacharium.io/api-documentation/self-hosted-embedding/fonts.md) for details.
## Playback Modes
The `mode` prop controls how the player behaves:
- **`"player"`** (default): Normal playback mode. Learners can interact with widgets and their progress is tracked.
- **`"review"`**: Read-only mode. Shows previous work with all interactions disabled. Use this when revisiting completed lessons.
```tsx
```
---
Source: https://docs.teacharium.io/api-documentation/self-hosted-embedding/media-resolution
# Media Resolution
Lessons may reference media files (images, videos, voiceovers) by ID. You provide resolver hooks that map these IDs to actual URLs.
```tsx
import { TeachariumPlayer } from "@teacharium/player";
import { getWidgets } from "@teacharium/widget";
// Map media IDs to static file paths
const mediaFiles: Record = {
"media:abc123": "/lessons/my-lesson/images/intro.png",
"media:def456": "/lessons/my-lesson/images/diagram.jpg",
};
// Hook that resolves media IDs to URLs
function useMediaUrl(mediaId: string | undefined) {
if (!mediaId) {
return { data: null, isLoading: false, error: null };
}
return { data: mediaFiles[mediaId] ?? null, isLoading: false, error: null };
}
// Hook that resolves voiceover content to audio URLs
function useVoiceoverUrl(
contentHash: string | undefined,
voice: string | undefined,
) {
if (!contentHash || !voice) {
return { data: null, isLoading: false, error: null };
}
return {
data: `/lessons/my-lesson/audio/${contentHash}.mp3`,
isLoading: false,
error: null,
};
}
function LessonPage() {
return (
);
}
```
## Resolver Hook Interface
The resolver hooks must return this shape:
```typescript
interface MediaUrlResult {
data: string | null | undefined;
isLoading?: boolean;
error?: Error | null;
}
```
---
Source: https://docs.teacharium.io/api-documentation/self-hosted-embedding/fonts
# Lesson Fonts
Authors can give a lesson two [Google Fonts](https://fonts.google.com): a **display** (decorative) font for H1 and H2 headings and a **body** font for everything else (see [Choose lesson fonts](https://docs.teacharium.io/docs/build-your-lesson/lesson-fonts.md)).
The self-hosted `TeachariumPlayer` always **applies** the lesson's fonts. By default it does **not load** the font files, so your page is responsible for that. This lets you decide where fonts come from: Google Fonts, your own CDN, or font files bundled with your app.
| Surface | Applies the fonts | Loads the font files |
| ------------------------------------------------------------------------------------ | ----------------- | ------------------------------------------------------------------- |
| Teacharium editor, preview and player | ✅ | ✅ from Google Fonts |
| [Hosted embedding](https://docs.teacharium.io/api-documentation/hosted-embedding.md) | ✅ | ✅ from Google Fonts |
| LTI | ✅ | ✅ from Google Fonts |
| Self-hosted `TeachariumPlayer` | ✅ | ❌ by default ([opt in](#option-1-let-the-player-load-google-fonts)) |
| [Exported ZIP](https://docs.teacharium.io/api-documentation/api/export-lesson.md) | ✅ (when played) | ❌ your page loads them |
If a font isn't loaded, the browser uses the fallback in the font stack (for example `system-ui, sans-serif`), so the lesson still works.
## Font data in the lesson
Fonts are stored on the lesson as `lesson.fonts`:
```json
{
"lesson": {
"id": "550e8400-e29b-41d4-a716-446655440000",
"title": "Introduction to Biology",
"fonts": {
"display": {
"family": "Lobster",
"category": "display",
"variants": ["400"]
},
"body": {
"family": "Open Sans",
"category": "sans-serif",
"variants": ["400", "700", "400i", "700i"]
}
}
}
}
```
| Field | Description |
| ---------- | ---------------------------------------------------------------------------------------------- |
| `display` | Font for H1 and H2. Omitted (or `null`) when the lesson uses the default heading font. |
| `body` | Font for everything else. Omitted (or `null`) when the lesson uses the default font. |
| `family` | Google Fonts family name. Letters, digits and spaces only. |
| `category` | `sans-serif`, `serif`, `display`, `handwriting` or `monospace`. Used to pick a fallback font. |
| `variants` | The weights the lesson uses: `"400"` is regular, `"700"` bold, and an `i` suffix means italic. |
Lessons without custom fonts have `"fonts": {}` (or no `fonts` key, for lessons exported before fonts were available). The player treats both as "use the default font". Invalid font entries are ignored, never fatal.
## Loading the fonts
### Option 1: let the player load Google Fonts
Set `fontLoading: "google"` and the player adds the Google Fonts stylesheet for the lesson's fonts:
```tsx
```
### Option 2: load the fonts yourself
Keep the default `fontLoading: "none"` and load the fonts however you like. The only requirement is that the **font-family name matches** `family` exactly (for example `"Open Sans"`).
The `buildGoogleFontsUrl` helper returns the right Google Fonts stylesheet URL for a lesson, or `null` when it uses the default fonts:
```tsx
import { buildGoogleFontsUrl } from "@teacharium/player";
const fontsUrl = buildGoogleFontsUrl(lessonData.lesson.fonts);
// "https://fonts.googleapis.com/css2?family=Lobster&family=Open+Sans:ital,wght@0,400;0,700;1,400;1,700&display=swap"
```
Then add it to your page, for example in a Next.js layout:
```tsx
{
fontsUrl && ;
}
```
To self-host the files instead (for privacy or offline use), declare `@font-face` rules using the same family names:
```css
@font-face {
font-family: "Open Sans";
font-weight: 400;
font-style: normal;
font-display: swap;
src: url("/fonts/open-sans-400.woff2") format("woff2");
}
@font-face {
font-family: "Open Sans";
font-weight: 700;
font-style: normal;
font-display: swap;
src: url("/fonts/open-sans-700.woff2") format("woff2");
}
/* ...one rule per entry in `variants` ("400i" → font-style: italic) */
```
### Exported lessons
Exported ZIPs don't contain font files. When the lesson has custom fonts, `manifest.json` includes a `fonts` entry with each font's details, the CSS `fontFamily` stack, and a ready-to-use Google Fonts URL:
```json
{
"fonts": {
"display": {
"family": "Lobster",
"category": "display",
"variants": ["400"],
"fontFamily": "\"Lobster\", system-ui, sans-serif"
},
"body": {
"family": "Open Sans",
"category": "sans-serif",
"variants": ["400", "700", "400i", "700i"],
"fontFamily": "\"Open Sans\", system-ui, sans-serif"
},
"googleFontsUrl": "https://fonts.googleapis.com/css2?family=Lobster&family=Open+Sans:ital,wght@0,400;0,700;1,400;1,700&display=swap"
}
}
```
## How fonts are applied (CSS scoping)
Lesson fonts only affect lesson content, never the rest of your page. Here is how that works, in case you want to customize it.
### Font scopes
The player marks the elements that render lesson content as **font scopes**: the start screen overlay (`.tp-start-overlay`), the step content (`.tp-content`) and the footer (`.tp-footer-wrapper`). Your `headerContent` and `sideContent` are **not** font scopes, so they keep your page's font.
A font scope carries data attributes, plus the font stacks as private custom properties in its inline style:
```html
```
`data-tp-lesson-font-body` and `data-tp-lesson-font-display` only appear when the lesson sets that font. Lessons with no custom fonts get no attributes at all, so your styling is untouched.
### The rules
The player stylesheet (`@teacharium/player/styles`) maps the private properties onto public ones:
```css
:where([data-tp-lesson-font-body]) {
--tp-font-family: var(--tp-lesson-font-body);
font-family: var(--tp-lesson-font-body);
}
:where([data-tp-lesson-font-display]) {
--tp-font-display: var(--tp-lesson-font-display);
}
:where([data-tp-lesson-fonts]) :where(h1, h2) {
font-family: var(--tp-font-display, inherit);
}
/* Browsers don't inherit fonts into form controls by default */
:where([data-tp-lesson-fonts]) :where(button, input, select, textarea) {
font-family: inherit;
}
```
Every selector is wrapped in `:where()`, so these rules have **zero specificity**. Two consequences:
- **Your CSS always wins.** Any rule that sets `font-family`, `--tp-font-family` or `--tp-font-display` overrides the lesson font, even a rule aimed at the scope element itself (such as a per-step class on `.tp-content`) and even a bare `h1 { … }`.
- **Widgets keep their own fonts.** A widget that sets its own font (code blocks, math, timers) is unaffected.
### Customization variables
| Variable | Set by lesson fonts to | Used for |
| ------------------- | ---------------------- | ------------------------------------------------------------ |
| `--tp-font-family` | Body font stack | Player and widget text (the player's existing font variable) |
| `--tp-font-display` | Display font stack | H1 and H2 inside a font scope |
Examples:
```css
/* Use the lesson's display font for H3 as well */
.teacharium-player :where(h3) {
font-family: var(--tp-font-display, inherit);
}
/* Force your own brand font everywhere, ignoring lesson fonts */
.teacharium-player [data-tp-lesson-fonts] {
--tp-font-family: "Brand Sans", sans-serif;
--tp-font-display: "Brand Sans", sans-serif;
font-family: "Brand Sans", sans-serif;
}
```
### Applying lesson fonts to your own components
If you render lesson content outside `TeachariumPlayer` (for example a custom step preview), use `getLessonFontScopeProps` to turn any element into a font scope:
```tsx
import { getLessonFontScopeProps, LessonFontLoader } from "@teacharium/player";
function MyPreview({ lesson, children }) {
const fonts = lesson.lesson.fonts;
const scope = getLessonFontScopeProps(fonts);
return (
{/* Optional: load the fonts from Google Fonts */}
{children}
);
}
```
`LessonFontLoader` renders the stylesheet `` in place rather than in ``, so it also works inside iframes.
## API summary
All exports are available from `@teacharium/player` (and `@teacharium/player/types` for the non-React helpers):
| Export | Description |
| -------------------------------- | ------------------------------------------------------------------------------ |
| `PlayerConfig.fontLoading` | `"none"` (default) or `"google"` |
| `LessonFonts`, `LessonFont` | Types for `lesson.fonts` |
| `LessonFontsSchema` | Zod schema for `lesson.fonts` |
| `normalizeLessonFonts(value)` | Validates fonts, dropping invalid entries |
| `buildGoogleFontsUrl(fonts)` | Google Fonts stylesheet URL, or `null` when there are no custom fonts |
| `getFontFamilyStack(font)` | CSS `font-family` value with fallback, e.g. `"Lobster", system-ui, sans-serif` |
| `getLessonFontScopeProps(fonts)` | Attributes and style that make an element a font scope |
| `LessonFontLoader` | React component that loads the fonts from Google Fonts |
---
Source: https://docs.teacharium.io/api-documentation/self-hosted-embedding/saving-progress
# Saving & Resuming Progress
The player does not have any built-in mechanism to fetch or decide on session state. Whether a lesson resumes or starts fresh is entirely controlled by whether you pass `initialSessionState`. If provided, the player restores the learner's position, variables, widget states, and item answers. If omitted, the player starts a fresh session from the beginning.
This differs from the [hosted embed SDK](https://docs.teacharium.io/api-documentation/hosted-embedding.md), which handles resume automatically via its `resume` option (default: `true`). When using `TeachariumPlayer` directly, you are responsible for loading and passing session state.
## Saving Progress
Use the `onStepChange` callback to persist session state at each step boundary:
```tsx
function LessonWithSaving({ lessonData }) {
const handleStepChange = async (sessionState: SessionState) => {
// Save to localStorage, server, etc.
localStorage.setItem(
`lesson-session-${lessonData.lesson.id}`,
JSON.stringify(sessionState),
);
};
return (
);
}
```
## Resuming Progress
Pass saved session state as `initialSessionState`:
```tsx
function ResumableLesson({ lessonData }) {
const savedSession = JSON.parse(
localStorage.getItem(`lesson-session-${lessonData.lesson.id}`) || "null",
);
return (
);
}
```
## Review Mode for Completed Lessons
When a lesson is completed, you can display it in review mode:
```tsx
function ReviewLesson({ lessonData, completedSessionState }) {
return (
);
}
```
---
Source: https://docs.teacharium.io/api-documentation/self-hosted-embedding/complete-example
# Complete Example
```tsx
import { useState, useEffect } from "react";
import {
TeachariumPlayer,
type TeachariumLessonExport,
type SessionState,
type CompletionResult,
} from "@teacharium/player";
import { getWidgets } from "@teacharium/widget";
// Media resolution
const mediaFiles: Record = {
"media:intro-image": "/lessons/intro/images/intro.png",
};
function useMediaUrl(mediaId: string | undefined) {
if (!mediaId) return { data: null };
return { data: mediaFiles[mediaId] ?? null };
}
function useVoiceoverUrl(
contentHash: string | undefined,
voice: string | undefined,
) {
if (!contentHash || !voice) return { data: null };
return { data: `/lessons/intro/audio/${contentHash}.mp3` };
}
export function LessonPage({
lessonData,
}: {
lessonData: TeachariumLessonExport;
}) {
const [initialSession, setInitialSession] = useState<
SessionState | undefined
>();
const [isReviewMode, setIsReviewMode] = useState(false);
// Load saved session on mount
useEffect(() => {
const saved = localStorage.getItem(`session-${lessonData.lesson.id}`);
if (saved) {
const session = JSON.parse(saved) as SessionState;
setInitialSession(session);
setIsReviewMode(session.progress.status === "completed");
}
}, [lessonData.lesson.id]);
// Save session state at step boundaries
const handleStepChange = (state: SessionState) => {
localStorage.setItem(
`session-${lessonData.lesson.id}`,
JSON.stringify(state),
);
};
// Handle completion
const handleComplete = (result: CompletionResult) => {
localStorage.setItem(
`session-${lessonData.lesson.id}`,
JSON.stringify(result.sessionState),
);
console.log("Lesson completed!", {
score: result.score,
maxScore: result.maxScore,
variables: result.finalVariables,
});
};
return (
);
}
```
---
Source: https://docs.teacharium.io/sample-lessons
# Sample Lessons
Explore interactive sample lessons built with Teacharium.
[Paramedic scenario with branching dialogue choices](https://docs.teacharium.io/sample-lessons/branching-dialogue.md)
Branching Dialogue
A paramedic emergency response scenario where learners make decisions that
lead to different outcomes and personalized feedback.
[See the lesson →](https://docs.teacharium.io/sample-lessons/branching-dialogue.md)
[See how it's built →](https://docs.teacharium.io/docs/see-it-built/branching-dialogue.md)
[Chemistry simulation with burette and flask](https://docs.teacharium.io/sample-lessons/acid-titration.md)
Chemistry: Acid Titration Simulation
An interactive chemistry simulation where learners perform an acid-base
titration, observing indicator color changes and determining equivalence
points.
[See the lesson →](https://docs.teacharium.io/sample-lessons/acid-titration.md)
[See how it's built →](https://docs.teacharium.io/docs/see-it-built/chemistry-simulation.md)
[Learning inventory results showing preference scales](https://docs.teacharium.io/sample-lessons/learning-inventory.md)
Learning Inventory
A learning style survey that measures preferences across three dimensions
— hands-on vs. theoretical, collaborative vs. independent, and structured
vs. exploratory — then visualizes the results.
[See the lesson →](https://docs.teacharium.io/sample-lessons/learning-inventory.md)
[See how it's built →](https://docs.teacharium.io/docs/see-it-built/learning-inventory.md)
[Cuban Missile Crisis decision-making scenario](https://docs.teacharium.io/sample-lessons/cuban-missile-crisis.md)
Cuban Missile Crisis
You are President Kennedy navigating the choices of the Cuban missile
crisis. How will your decisions fare?
[See the lesson →](https://docs.teacharium.io/sample-lessons/cuban-missile-crisis.md)
[See how it's built →](https://docs.teacharium.io/docs/see-it-built/cuban-missile-crisis.md)
---
Source: https://docs.teacharium.io/sample-lessons/branching-dialogue
# Branching Dialogue
Interactive lesson (open in a browser to try it): [https://docs.teacharium.io/sample-lessons/branching-dialogue](https://docs.teacharium.io/sample-lessons/branching-dialogue)
[See how this lesson is made →](https://docs.teacharium.io/docs/see-it-built/branching-dialogue.md)
---
Source: https://docs.teacharium.io/sample-lessons/acid-titration
# Chemistry: Acid Titration Simulation
Interactive lesson (open in a browser to try it): [https://docs.teacharium.io/sample-lessons/acid-titration](https://docs.teacharium.io/sample-lessons/acid-titration)
[See how this lesson is made →](https://docs.teacharium.io/docs/see-it-built/chemistry-simulation.md)
---
Source: https://docs.teacharium.io/sample-lessons/learning-inventory
# Learning Inventory
Interactive lesson (open in a browser to try it): [https://docs.teacharium.io/sample-lessons/learning-inventory](https://docs.teacharium.io/sample-lessons/learning-inventory)
[See how this lesson is made →](https://docs.teacharium.io/docs/see-it-built/learning-inventory.md)
---
Source: https://docs.teacharium.io/sample-lessons/cuban-missile-crisis
# Cuban Missile Crisis
Interactive lesson (open in a browser to try it): [https://docs.teacharium.io/sample-lessons/cuban-missile-crisis](https://docs.teacharium.io/sample-lessons/cuban-missile-crisis)
[See how this lesson is made →](https://docs.teacharium.io/docs/see-it-built/cuban-missile-crisis.md)